The Standard Futsal Corner Kick: Triangle Setup and 3 Attack Options
Published: 2021.05.01Updated: 2026.05.04
It would not be an exaggeration to say that the corner kick with a triangle initial setup is the most standard corner-kick pattern in futsal, used widely from amateur teams to professional sides.
Because this set play has several options (patterns), even if the opponent reads one of them, you can still choose a different option.
One reason this set play is used so widely is that you can flexibly switch options depending on the opponent and keep increasing your chances of scoring.
This time, I will break down all of those options and the core ideas behind them in detail.
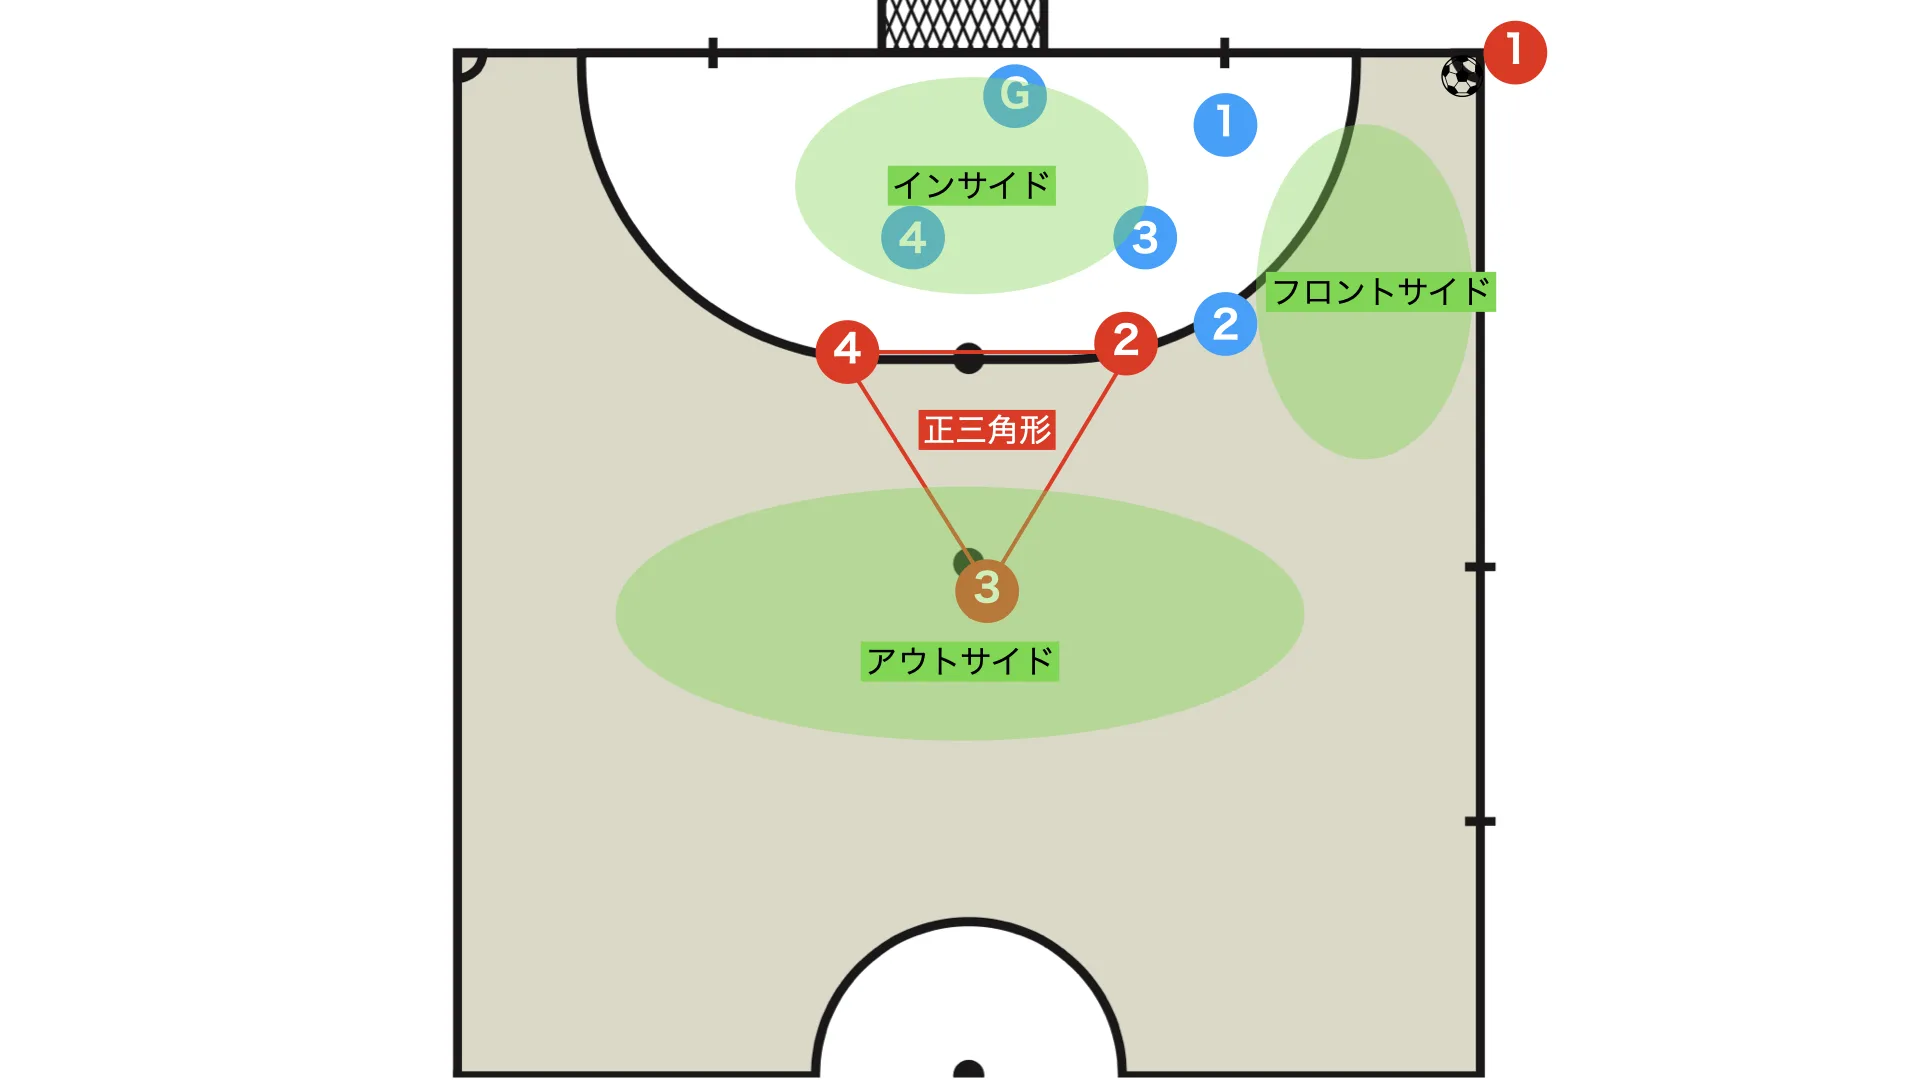
Initial setup
- Triangle
- The front two players (red 2 and red 4) stand on the penalty-area line
- The deeper player (red 3) stands on the second penalty mark
The target areas (zones) for this corner kick can be divided into the following three:
- Outside
- Front side
- Inside
For the finish, the zones become more dangerous to the opponent in this order: inside > front side > outside.
However, any decent team will not leave the inside open easily, so in practice you attack in the reverse order.
Order of the zones to attack
- Outside
- Front side
- Inside
In every set play, deciding who stands where is extremely important.
Set up quickly while taking into account both each player's qualities and the qualities required in that specific area.
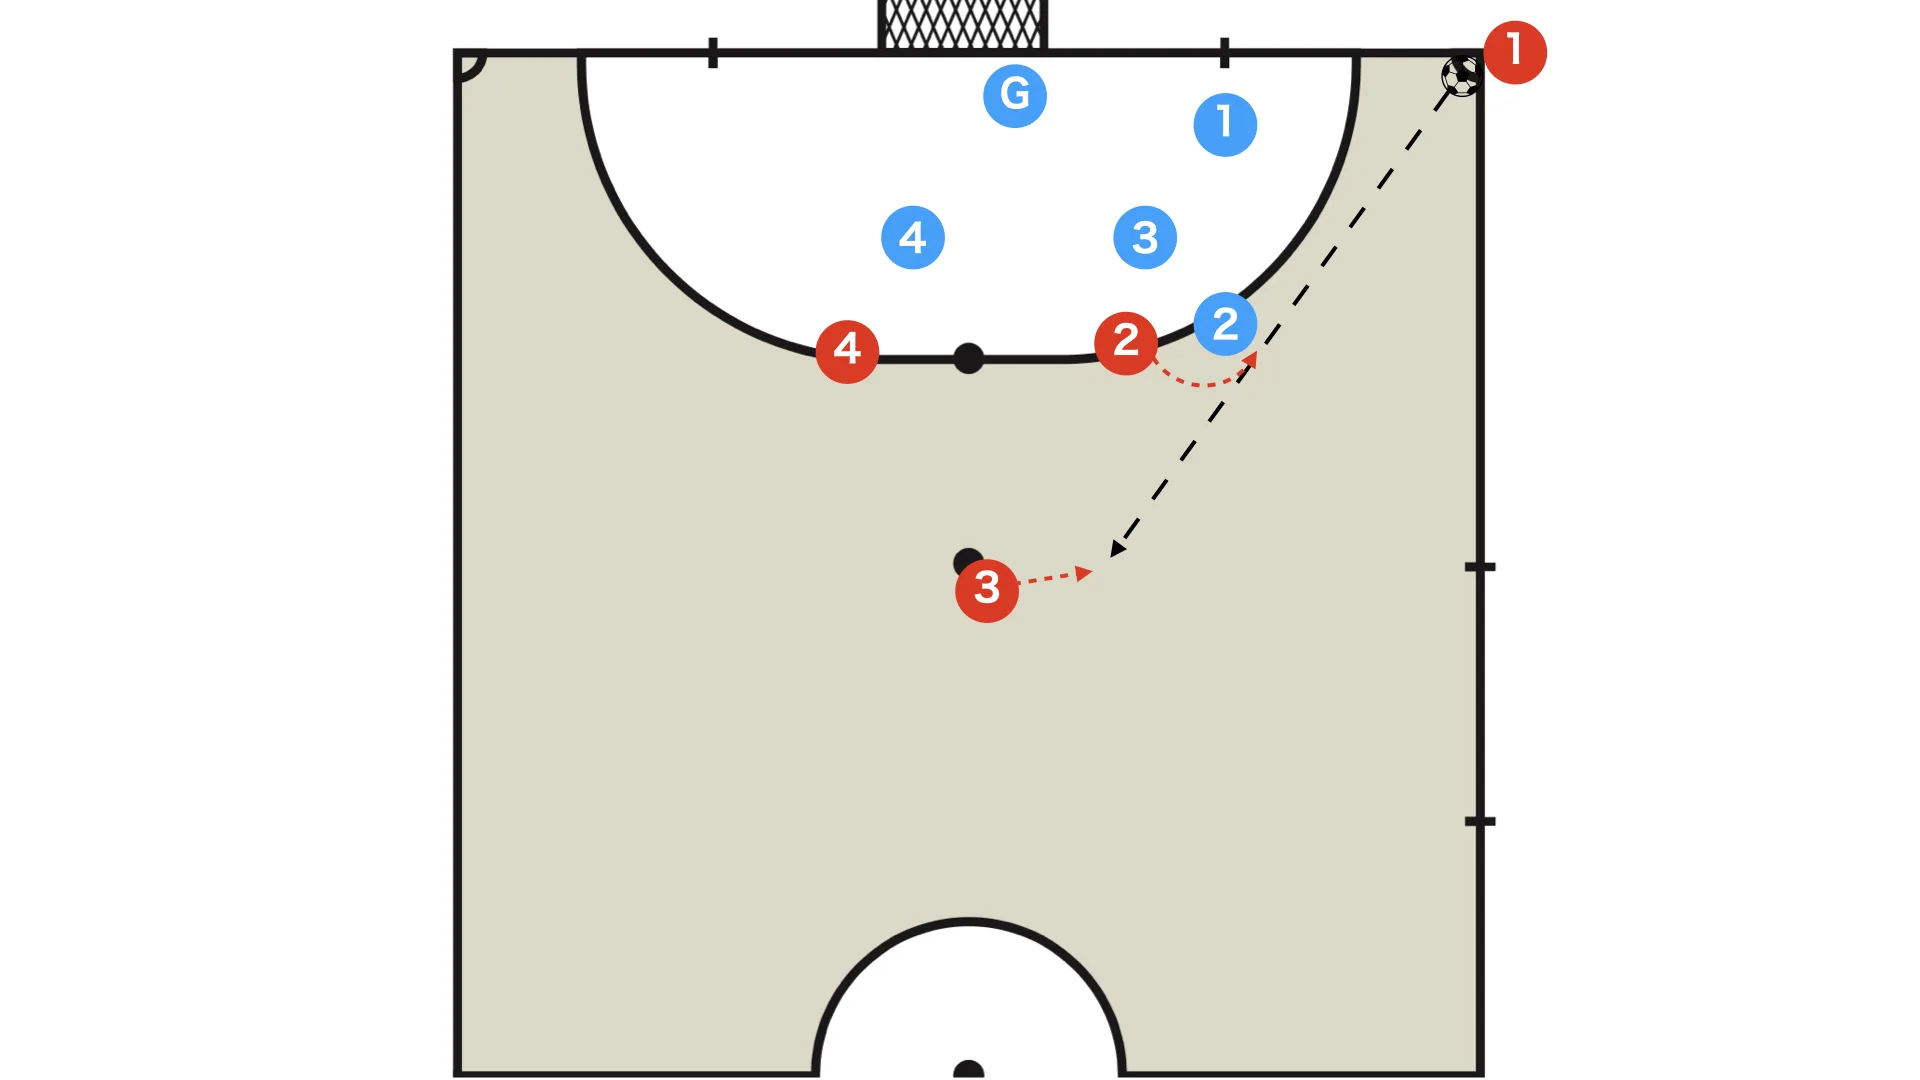
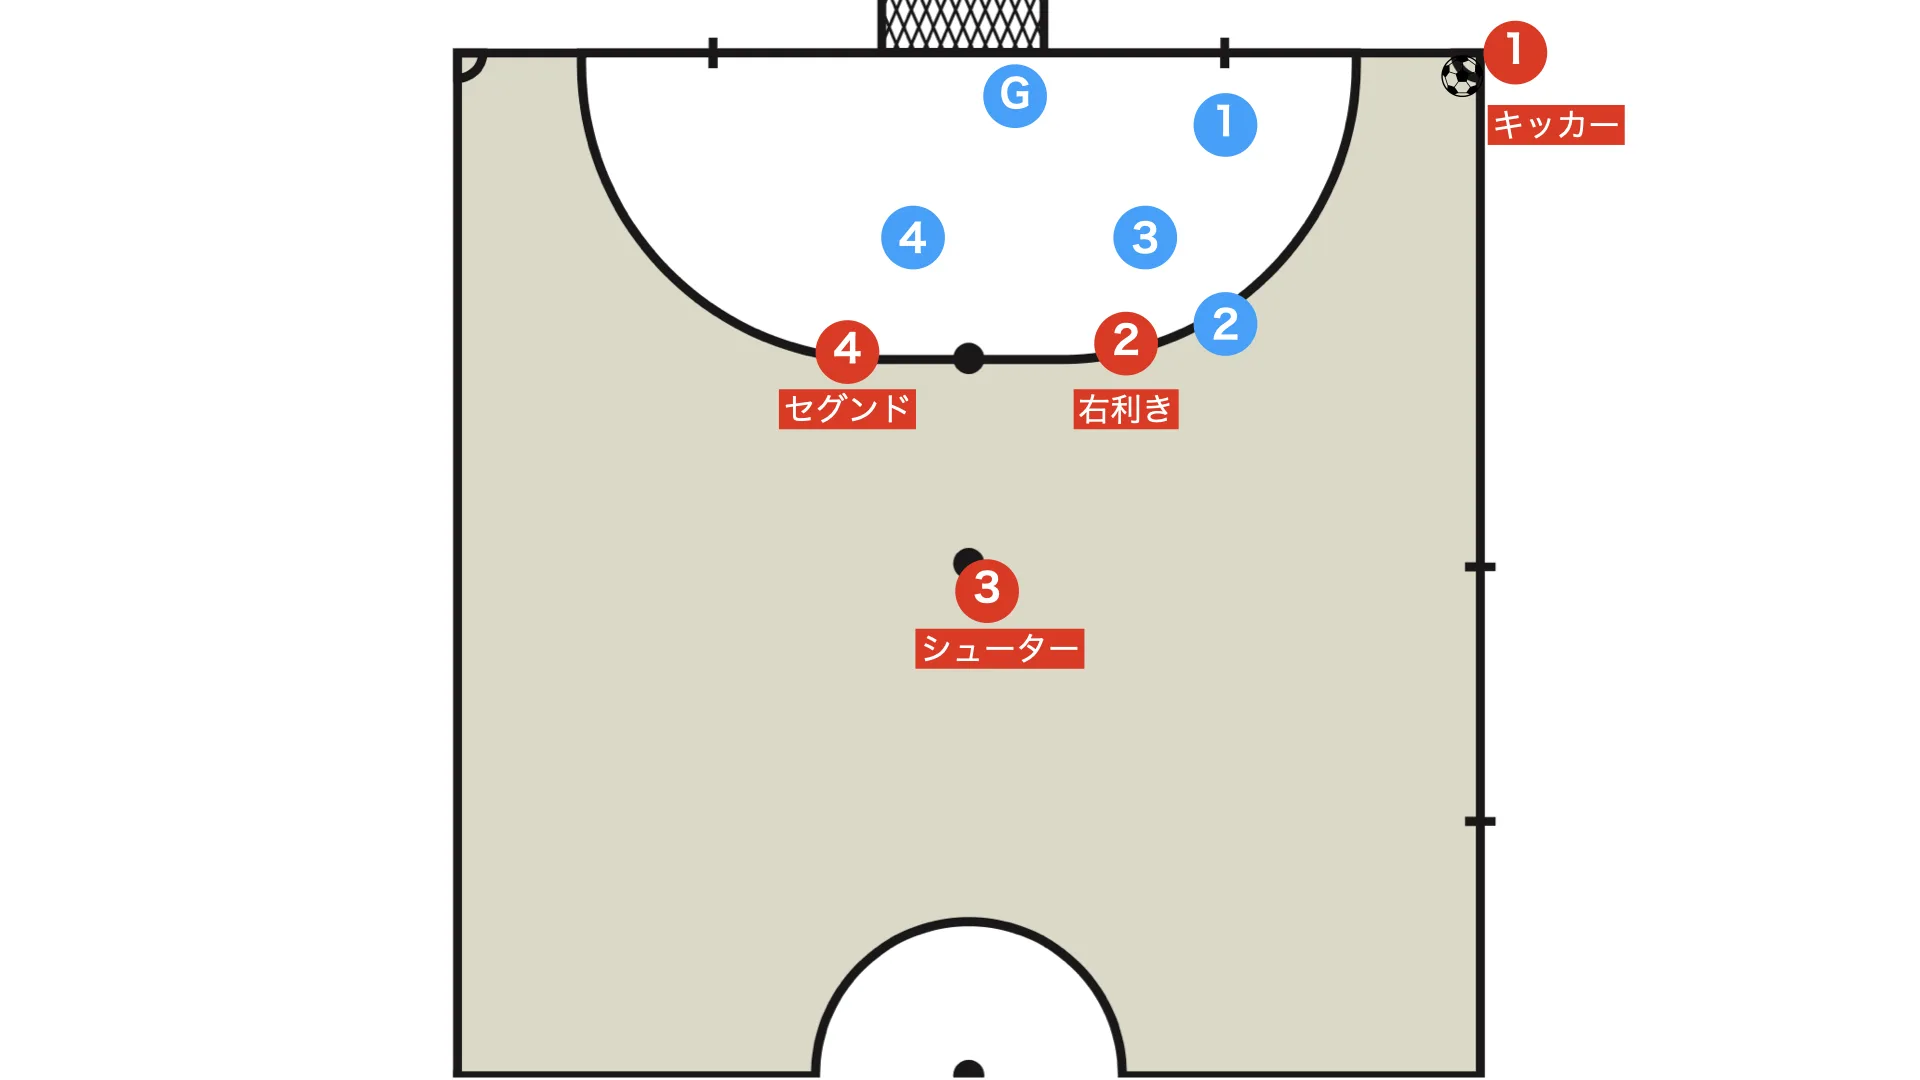
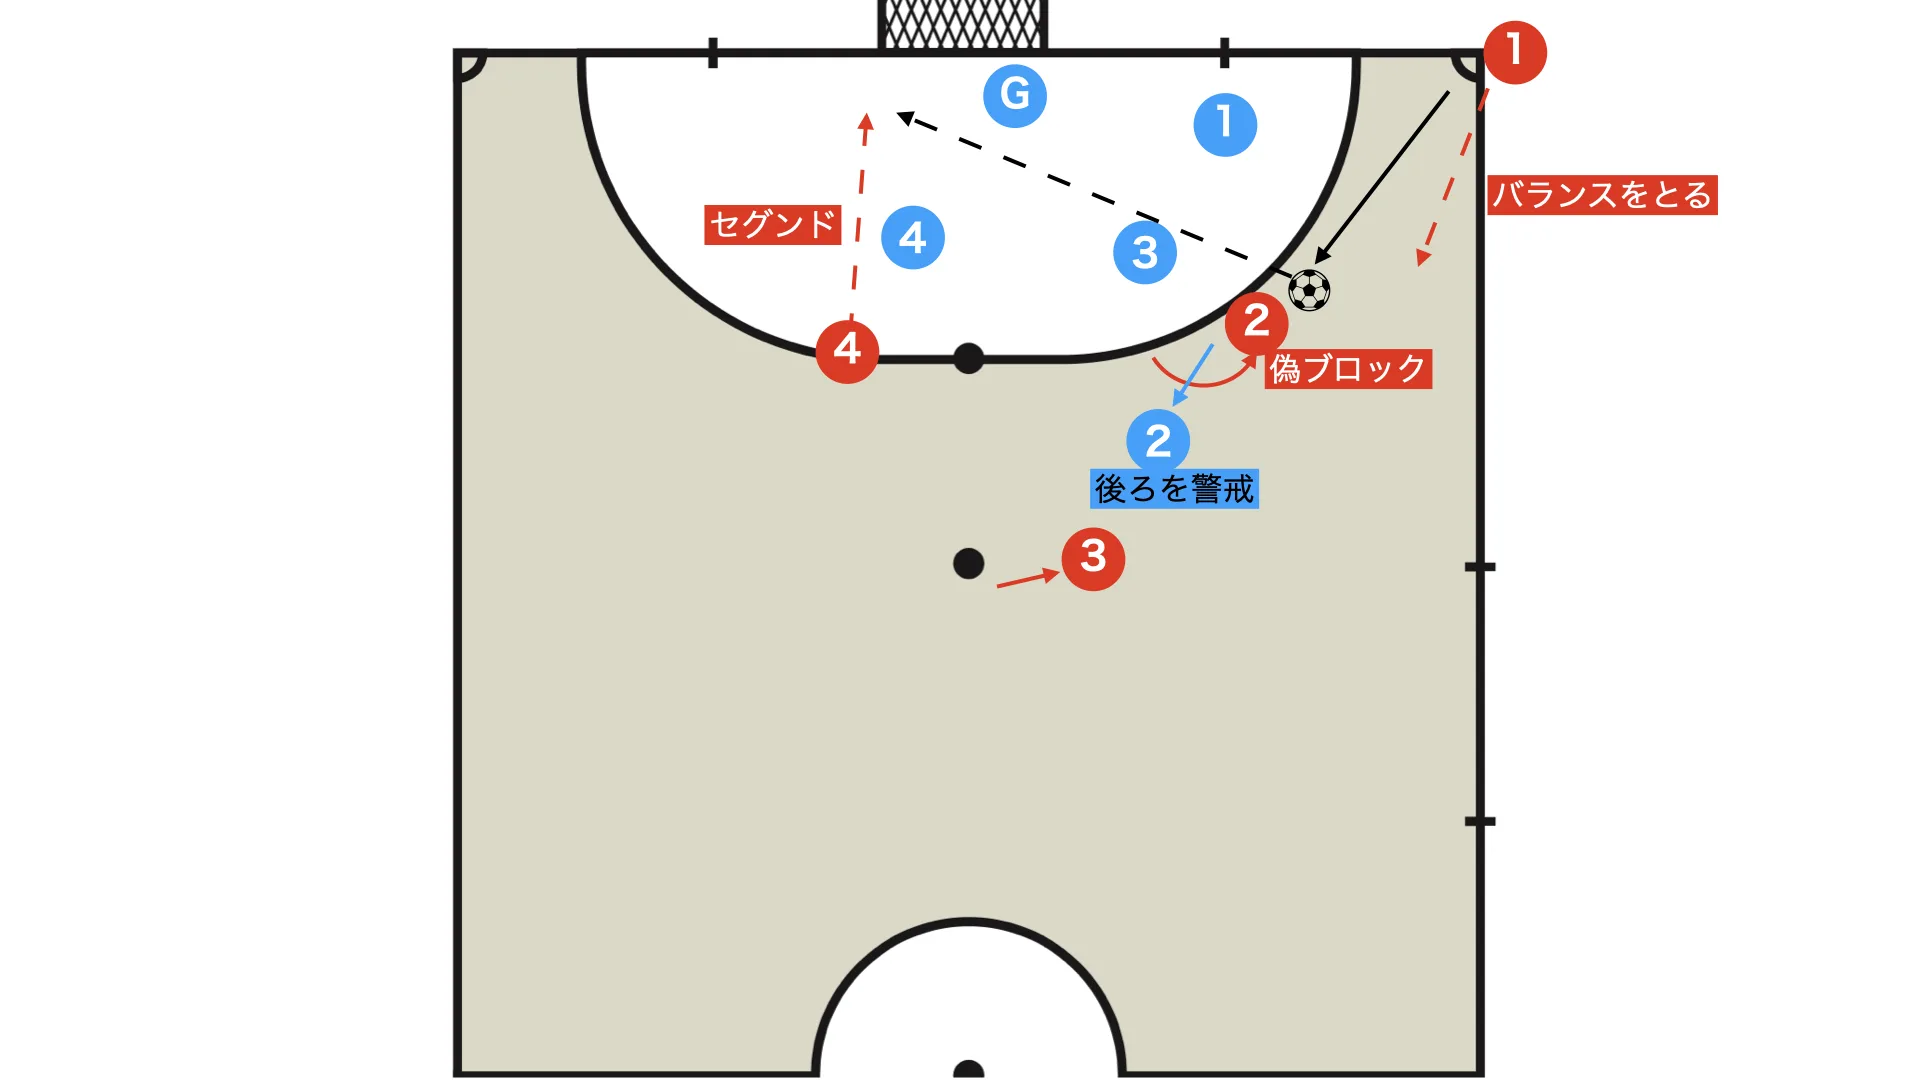
Opening movement
Red 2 circles across the front of blue 2.
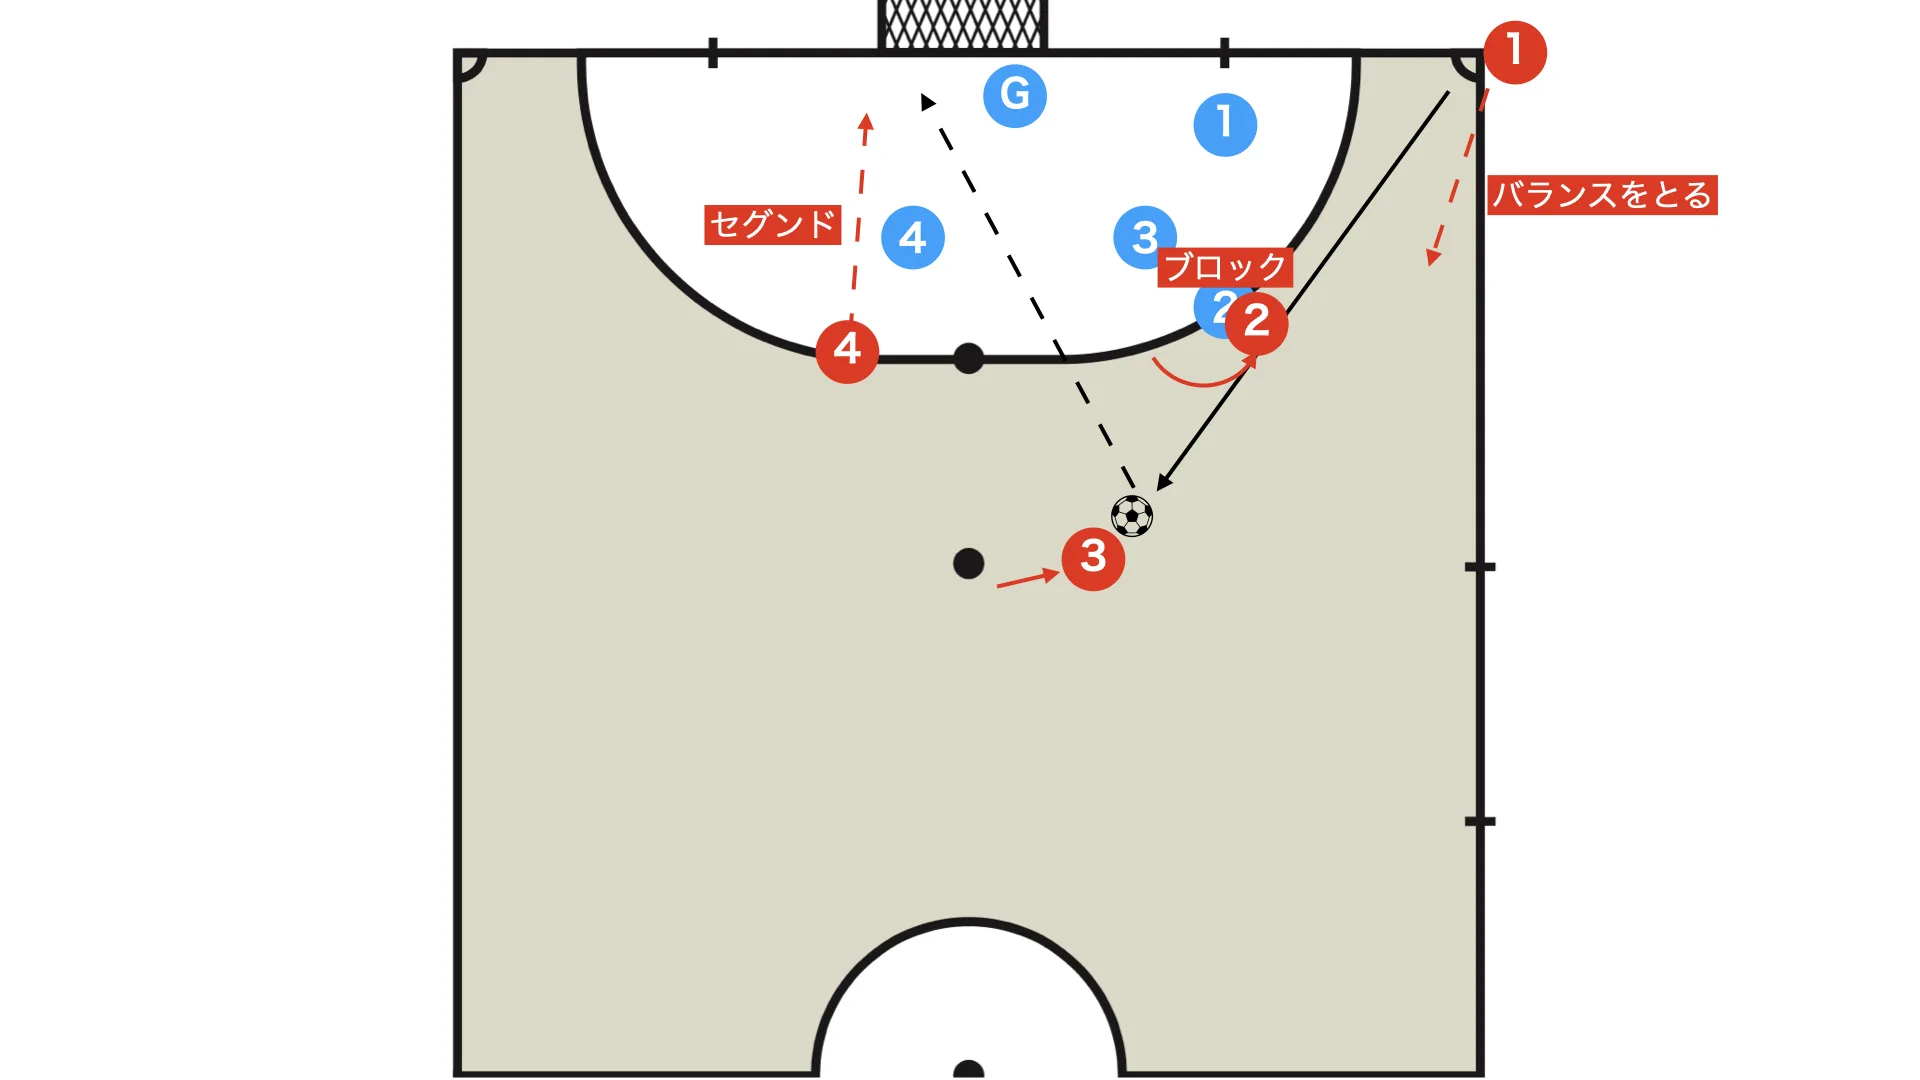
Each player's movement and role
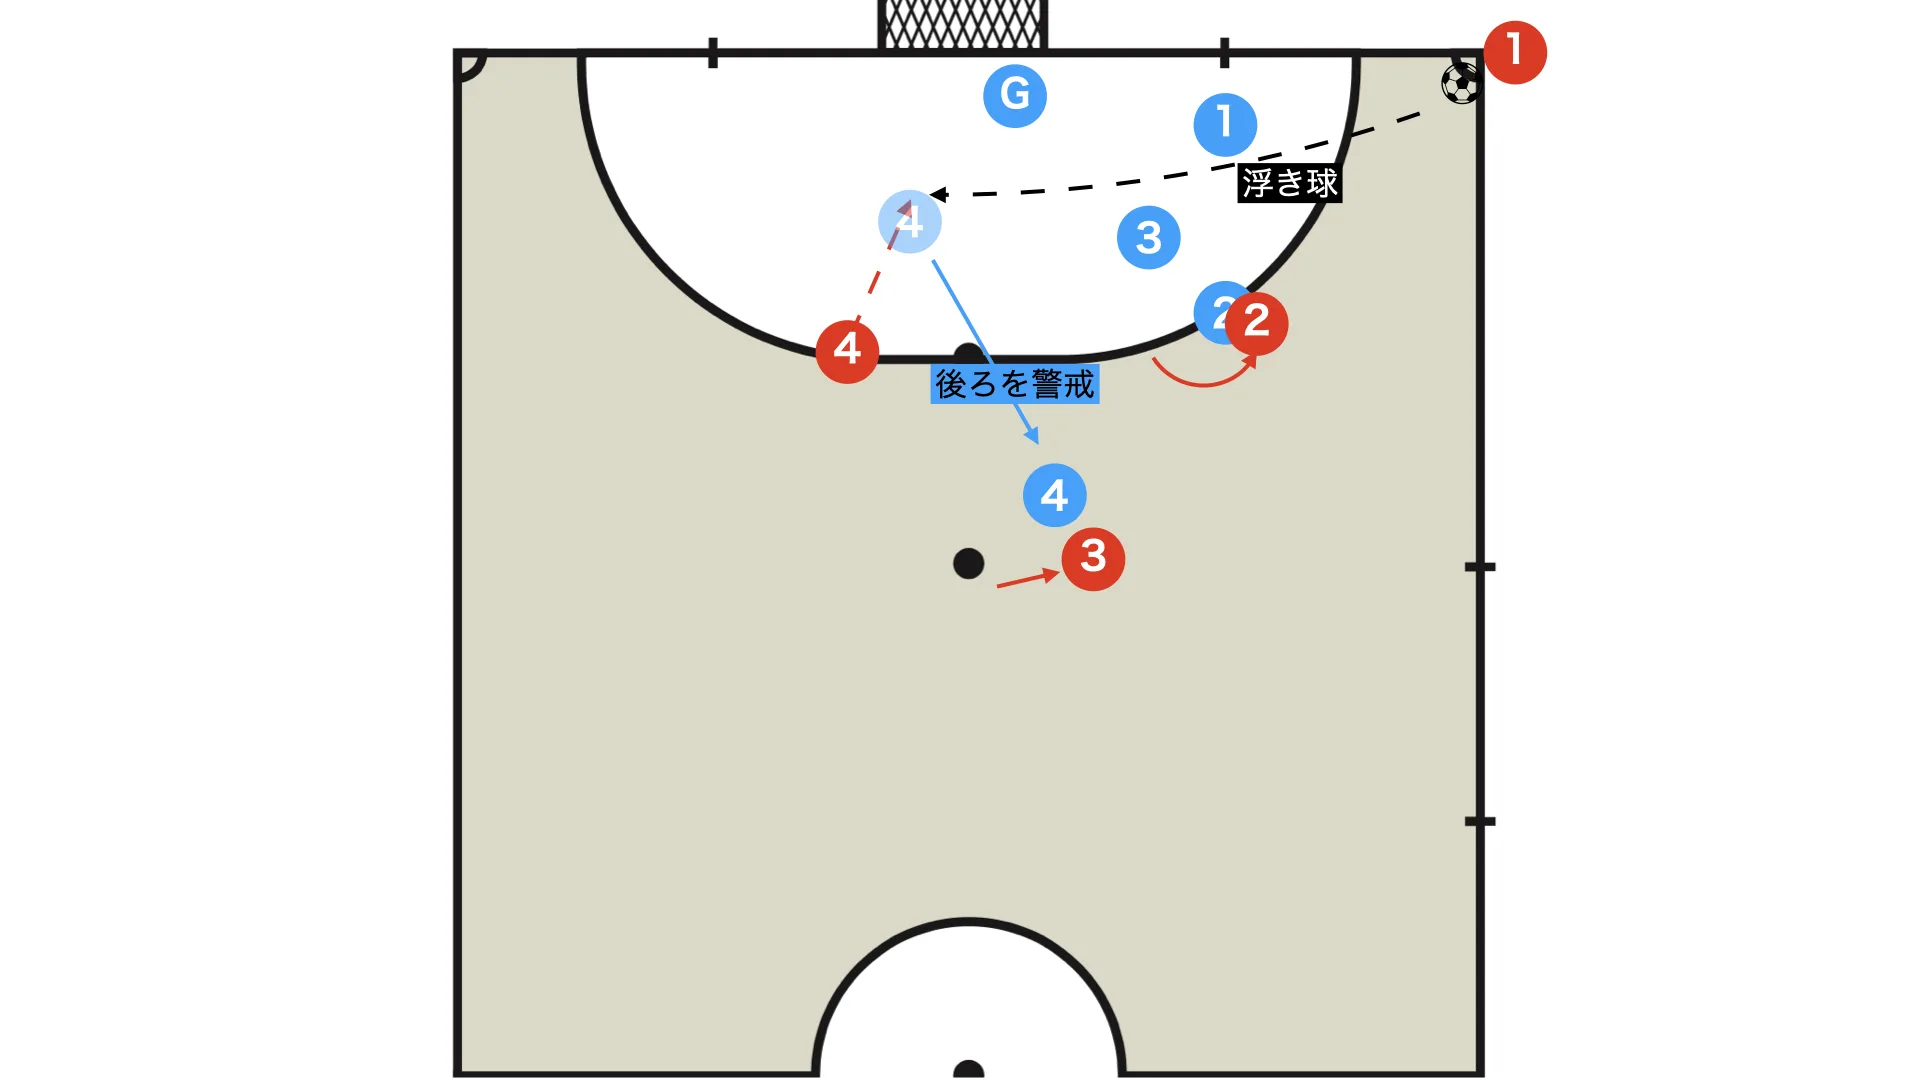
- Red 1 drops to around the height of blue 3 as protection against the counterattack
- Red 2: feigns a shot, then blocks blue 2 and lets the ball run to secure the passing lane to red 3
- Red 3 takes a mid-range shot (ideally first time)
- Red 4 attacks the second post
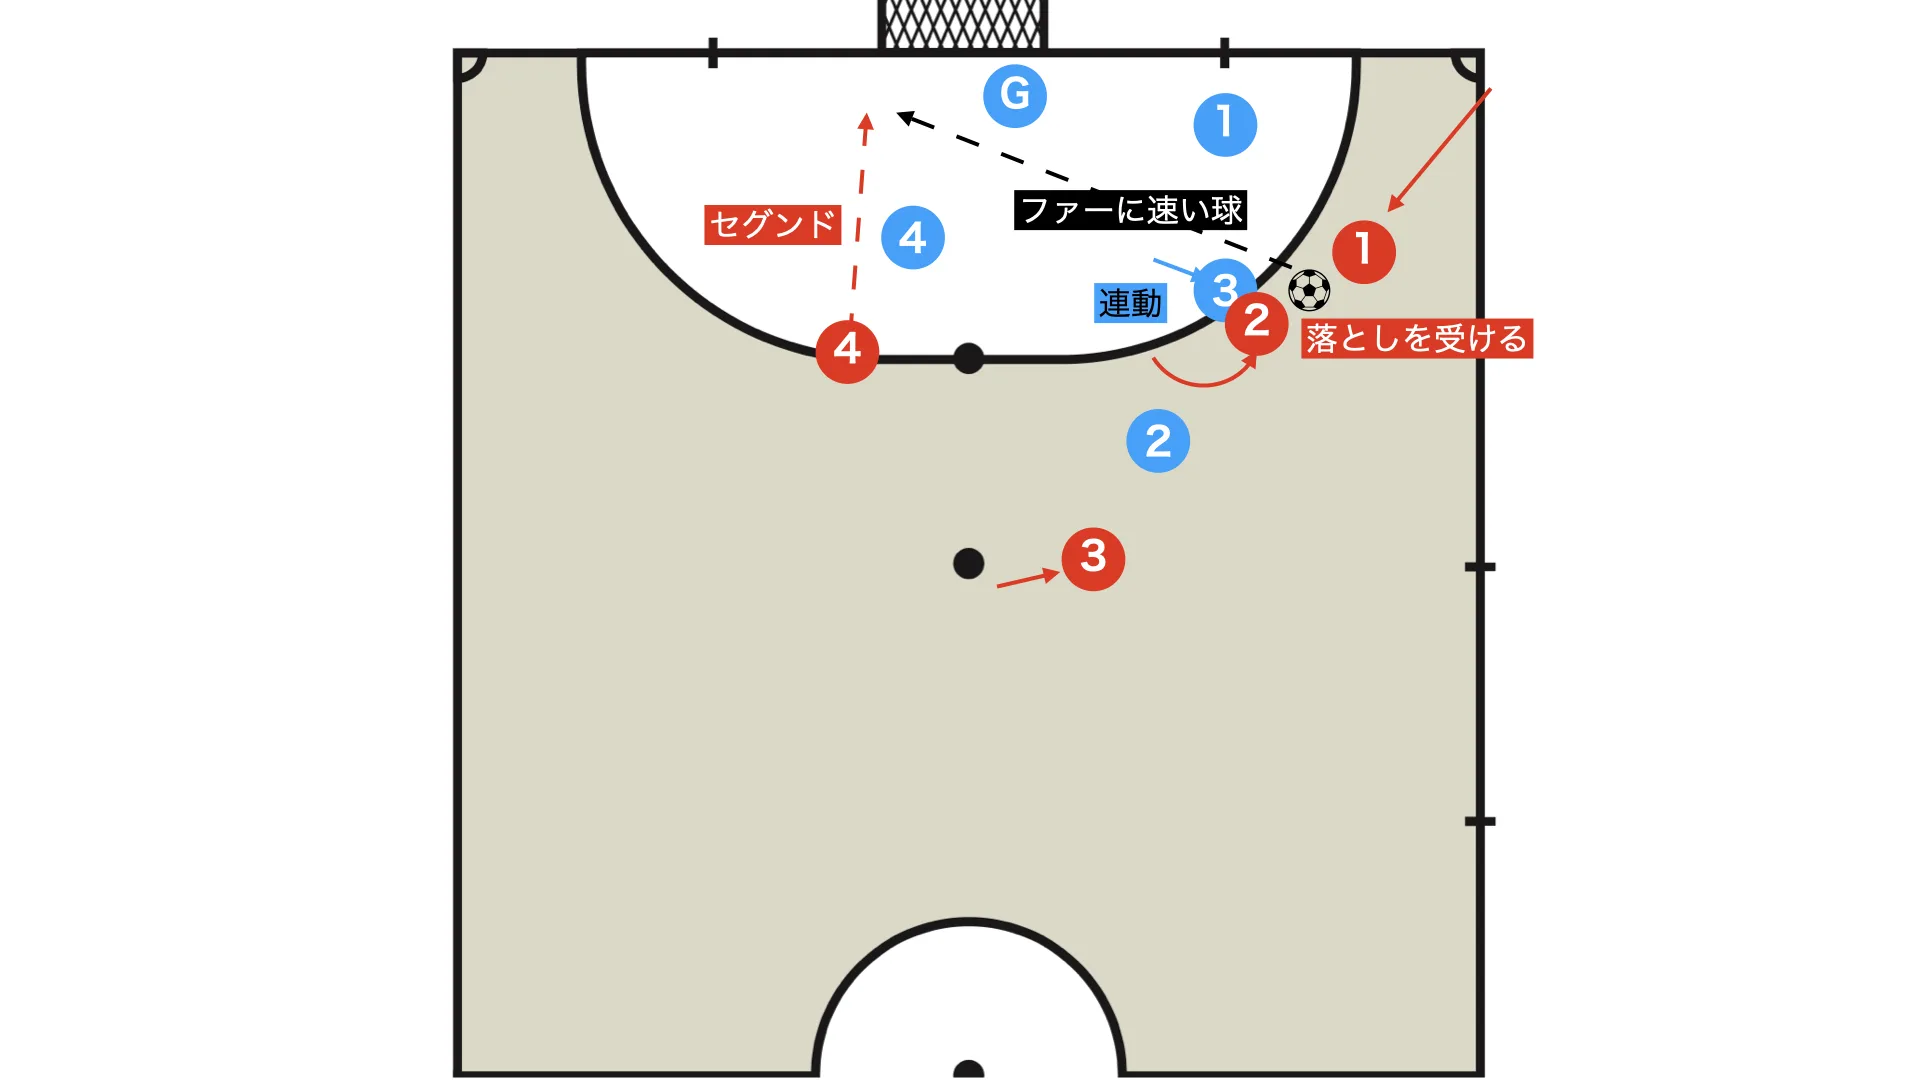
If red 3 is on the opposite foot or is especially good at volleys, you can choose a volley shot instead of the layoff to a mid-range strike.
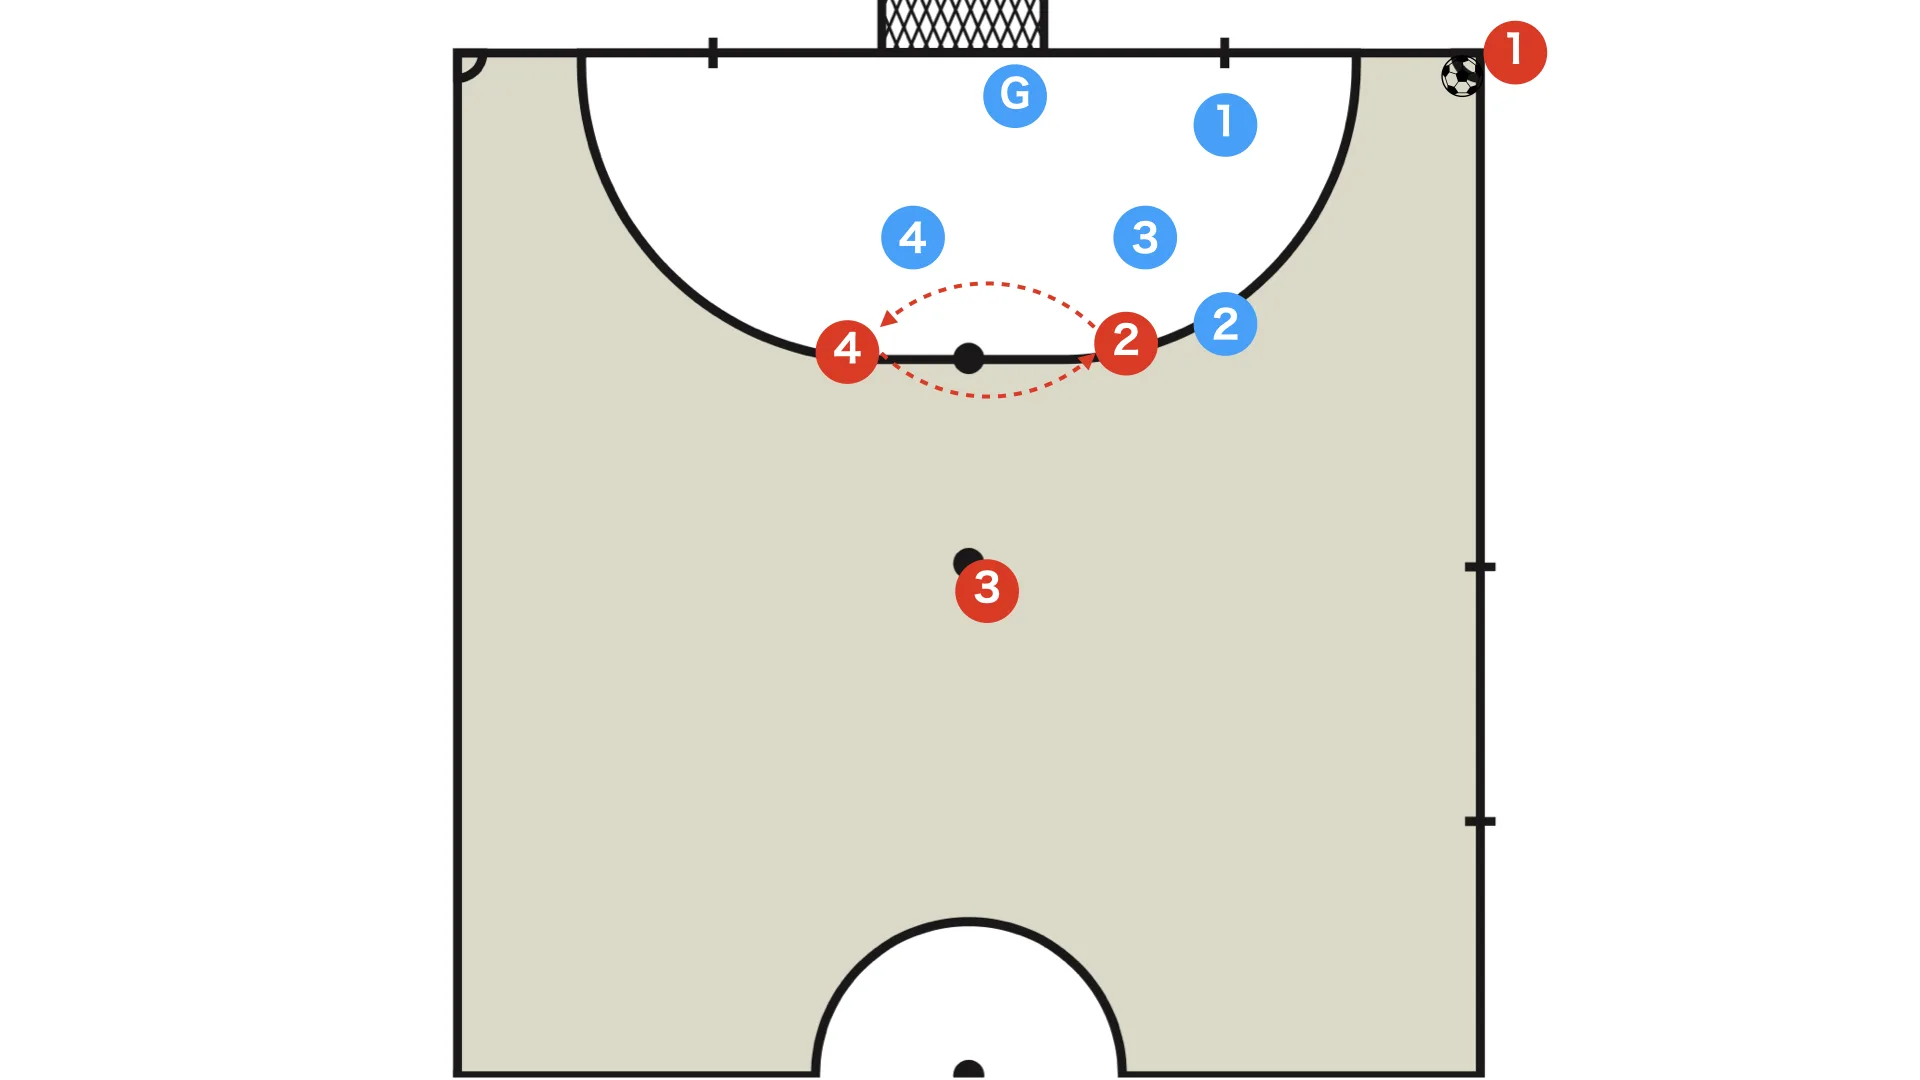
Each player's movement and role
- Red 1 attacks the second post
- Red 2 blocks and provides balance (with awareness of counterattack cover)
- Red 3 takes the volley shot
- Red 4 sets the block
Many people forget this, but when using a volley shot, the basic rule is that the kicker becomes the second-post runner.
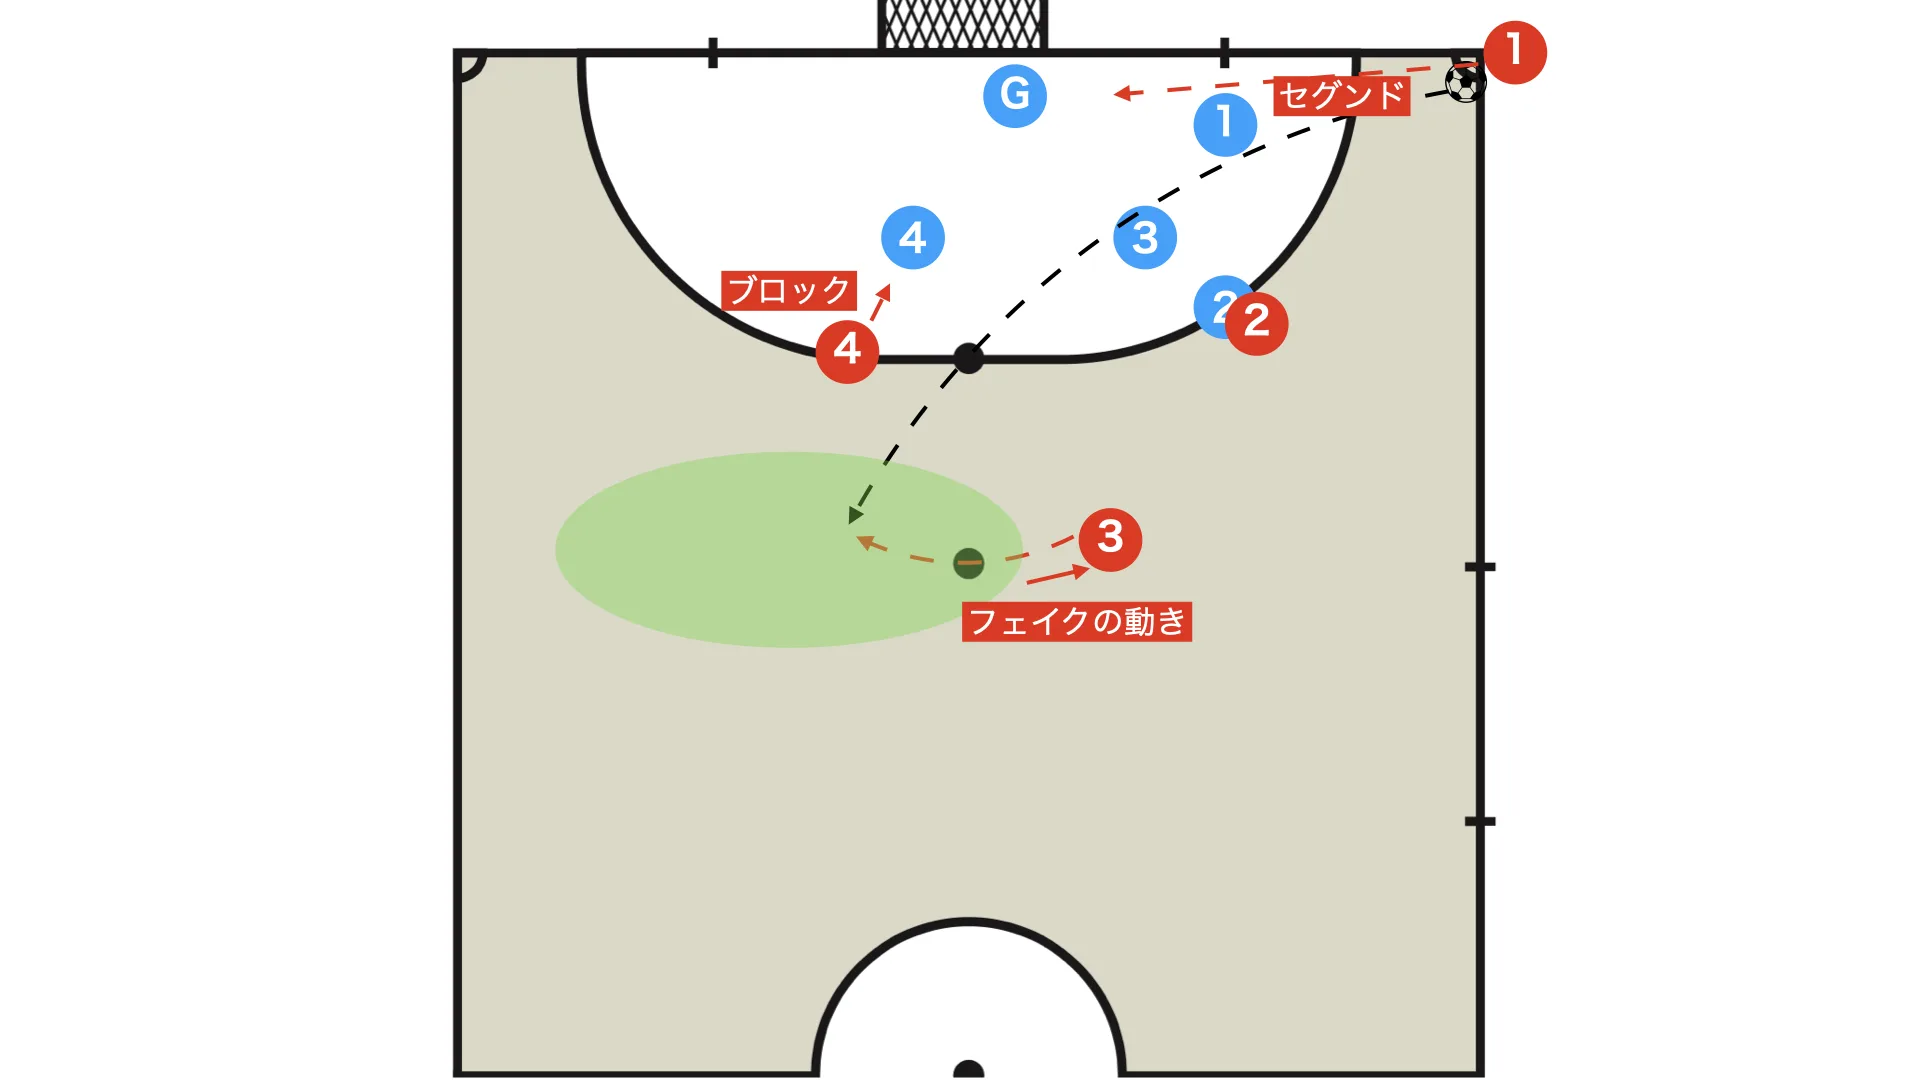
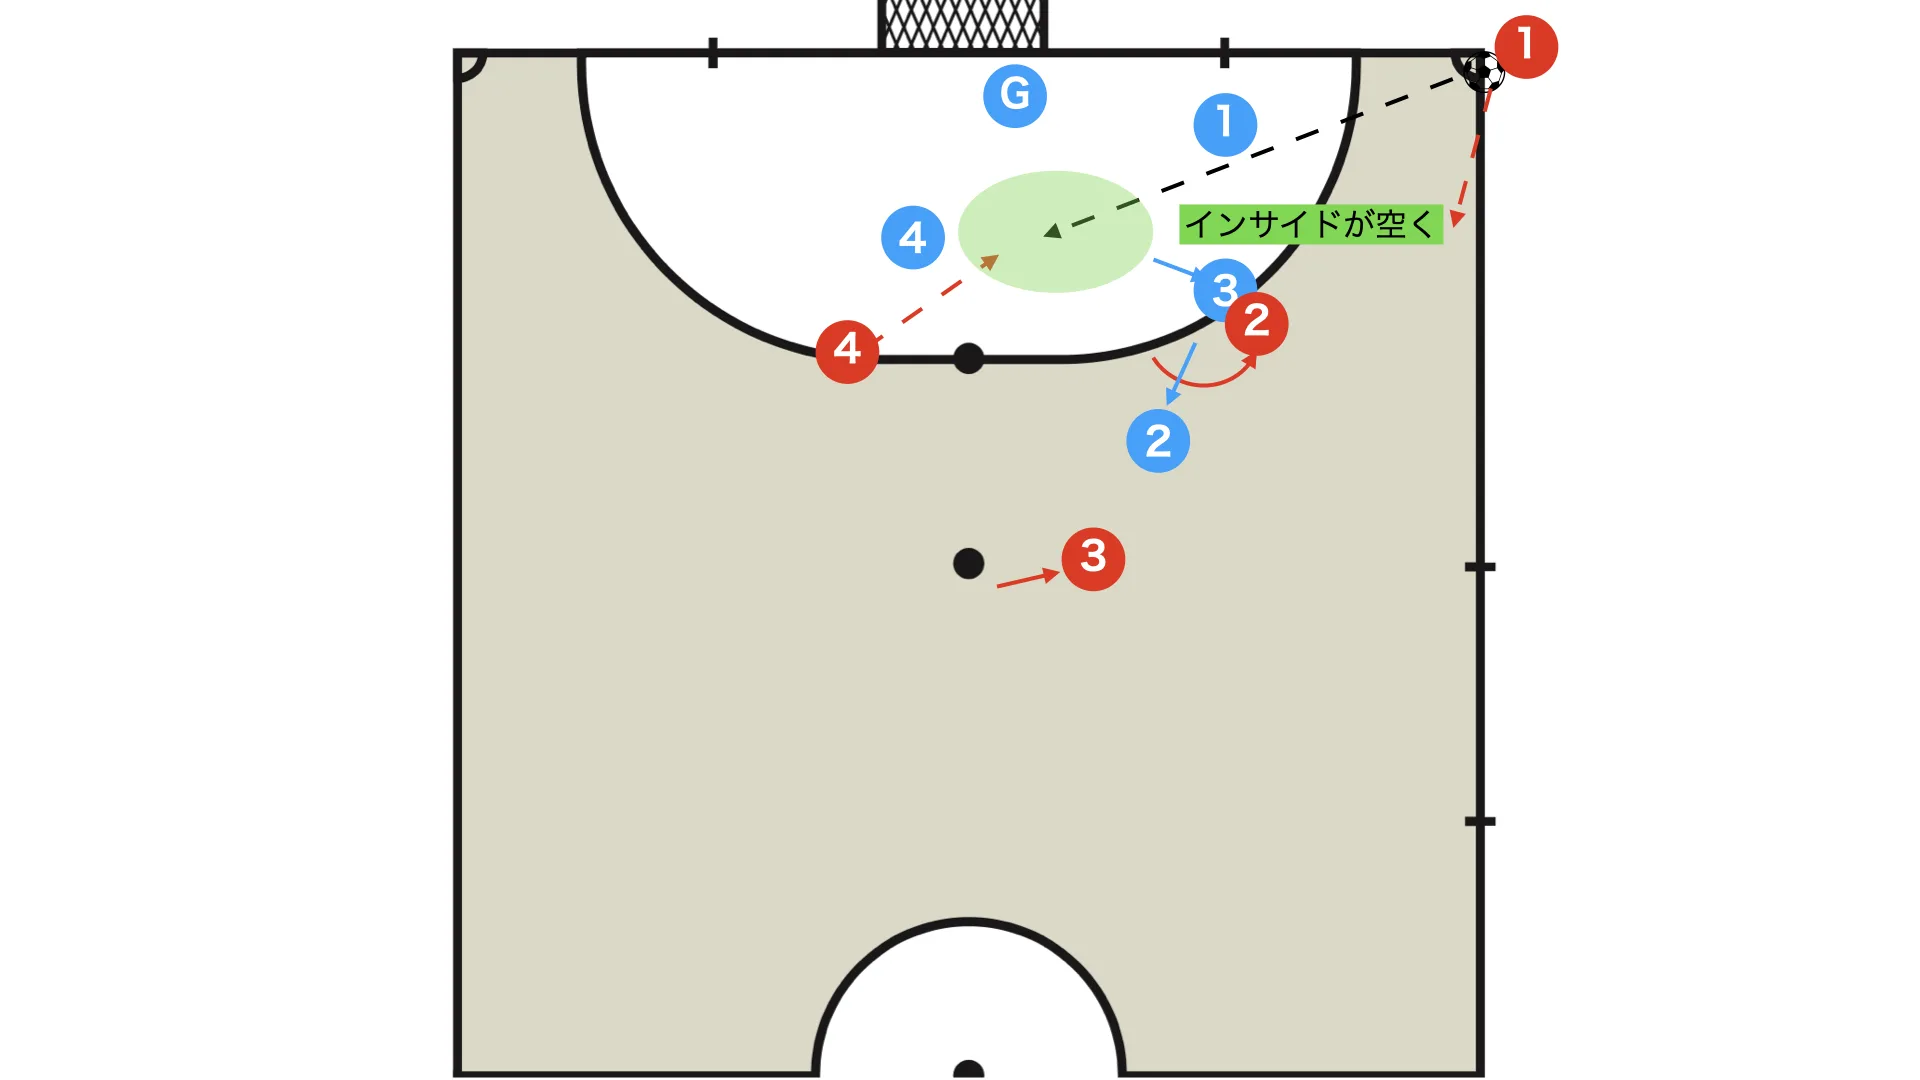
If you use the layoff to a mid-range shot repeatedly, the opponent will gradually become more aware of the deeper option, and blue 2 may start dropping toward the back as shown in the diagram.
In that situation, it becomes effective for red 2 to shoot on the front side.
You can also attack the front side by using the moment when blue 2 slips around red 2's block and becomes free. (Using a fake block)
What is a fake block?
By showing a clear intention to block, you make the opponent feel threatened by the block, and then you use the moment when they try to slip around it and leave themselves free.
(The more obvious you make the block look, the more likely the opponent is to try to get around it.)
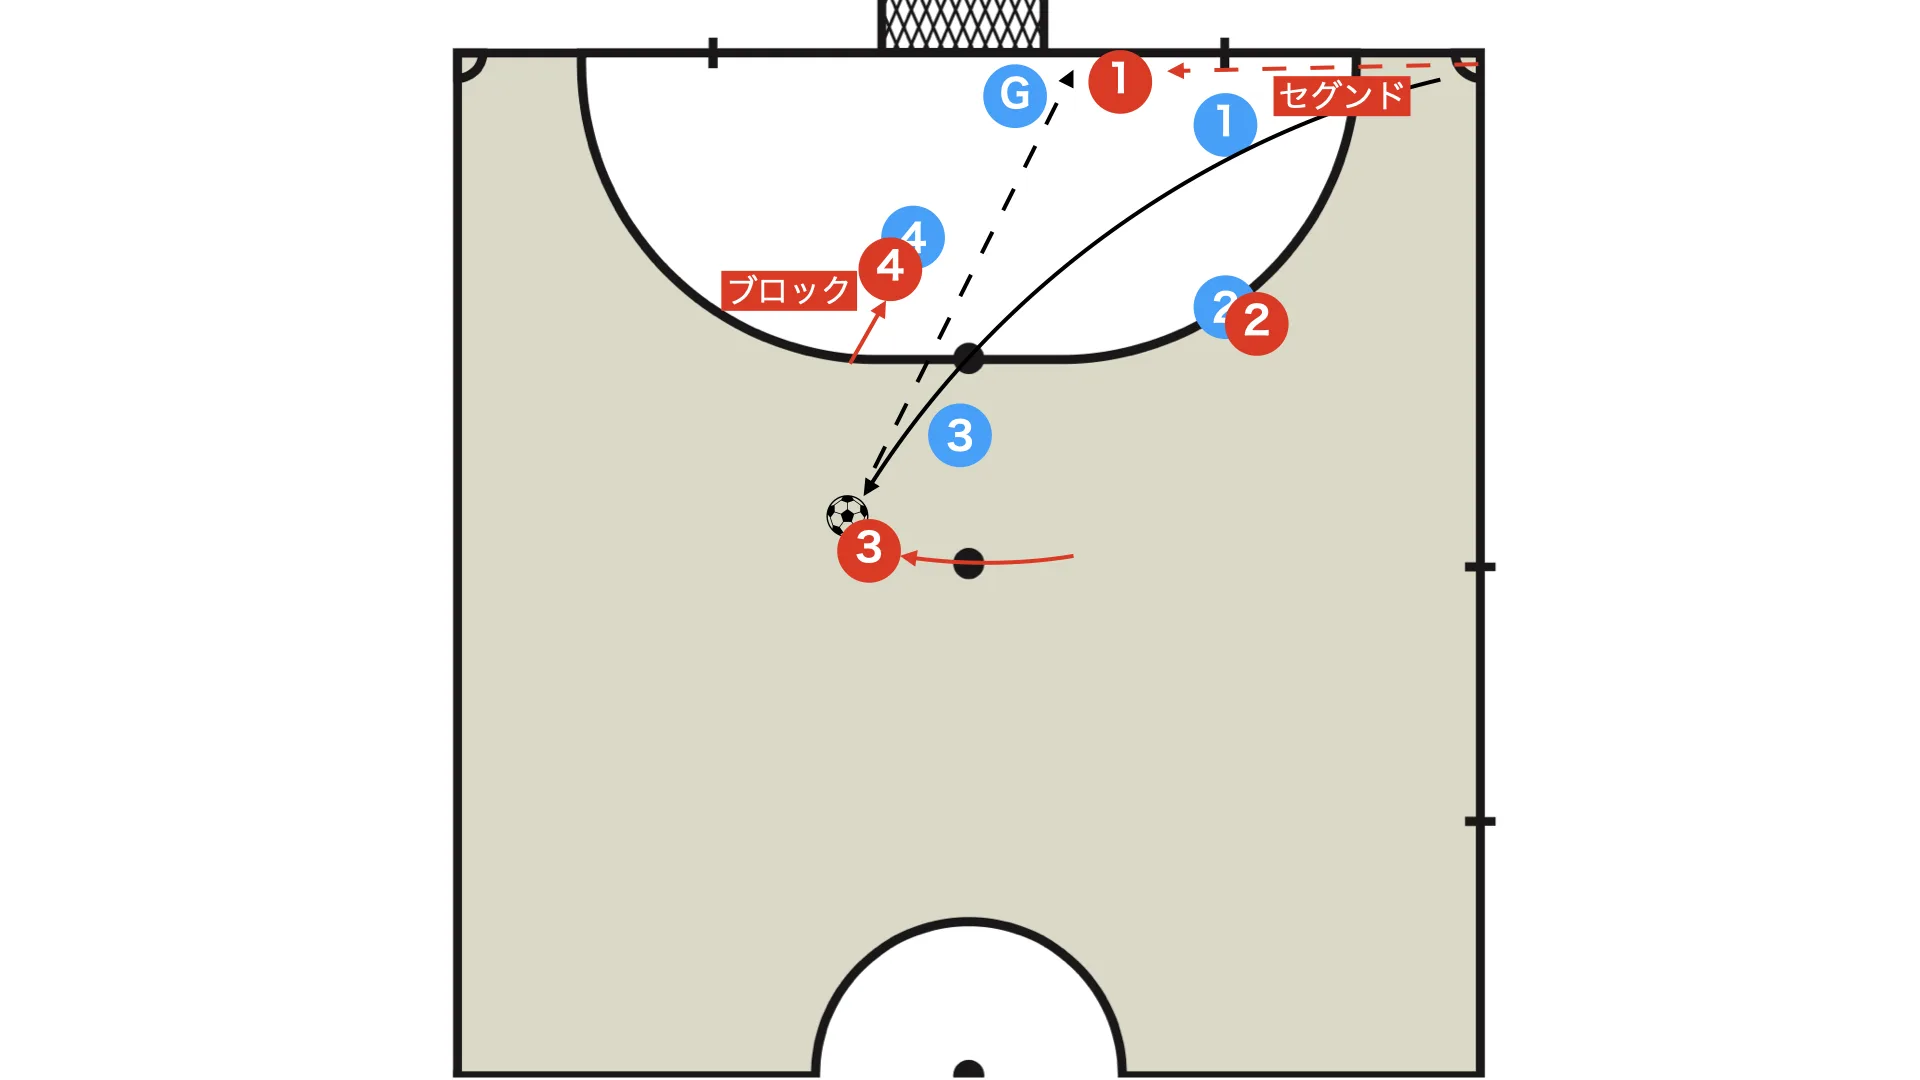
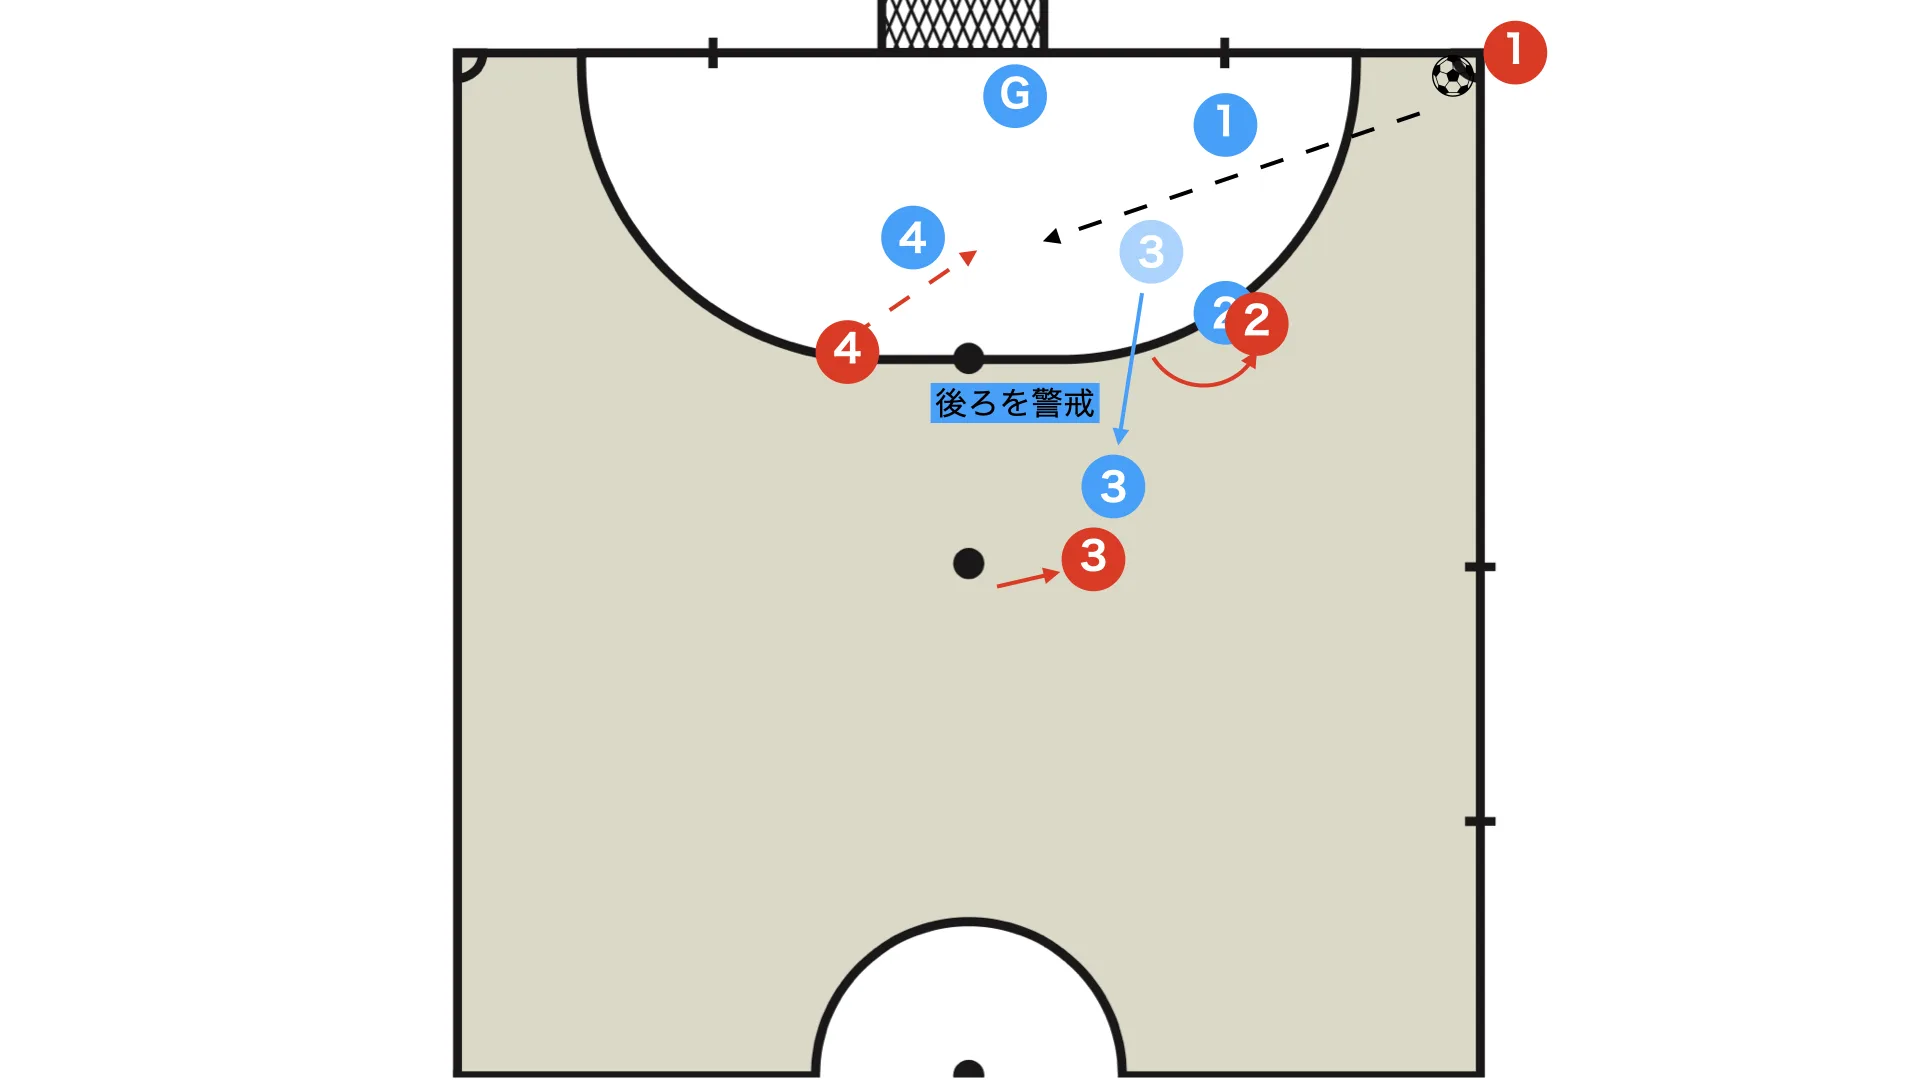
You may think the front side is available, but if blue 3 reacts a little late and closes it down, the shot is no longer on.
In that case, it is effective to drop the ball back to red 1 with the sole of the foot (the foot farther from the defender) and fire a quick pass toward the second post.
Additional note
It can also be effective for red 1 to overlap red 2 and play the pass with a pisada.
(In that case, red 2 takes on a pivo-like role.)
Because there is a risk of getting trapped by blue 2 and conceding a counterattack, I do not particularly recommend it.
If blue 2 and blue 3 move in sync at the same time, with a man-oriented mindset, the inside opens up.
By attacking from the outside and the front side first, you create danger for the opponent and naturally make the inside easier to exploit.
Depending on the team, there are also cases where blue 3 steps forward.
It is not ideal, but some teams push the far-side defender, blue 4, forward depending on the situation.
In that case, the far side becomes free, but it is difficult to thread a grounded pass through, so a lofted ball becomes effective.
If you drive the ball in at head height and finish with a header, the opponent has almost no way to stop it.
Lofted balls are effective not only in this set play, but in all situations.
What did you think?
With set plays, it is not just about increasing variety. It is extremely important to raise the quality of each one.
If this article introduced an option your team has not used before, I recommend trying to add it.
If the front two players (red 2 and red 4) switch positions, it becomes easier to shake off the opponent's marking.
(A fake position switch, or switching twice and returning to the original spots, can also be effective.)
Once your team gets comfortable with the basic pattern, I recommend adding the position-switch option as well.