
Transition: Plus-One Numerical Imbalance (1v1 with the Goalkeeper, 1v2, 2v3, 3v4)
Published: 2021.06.03Updated: 2026.05.03
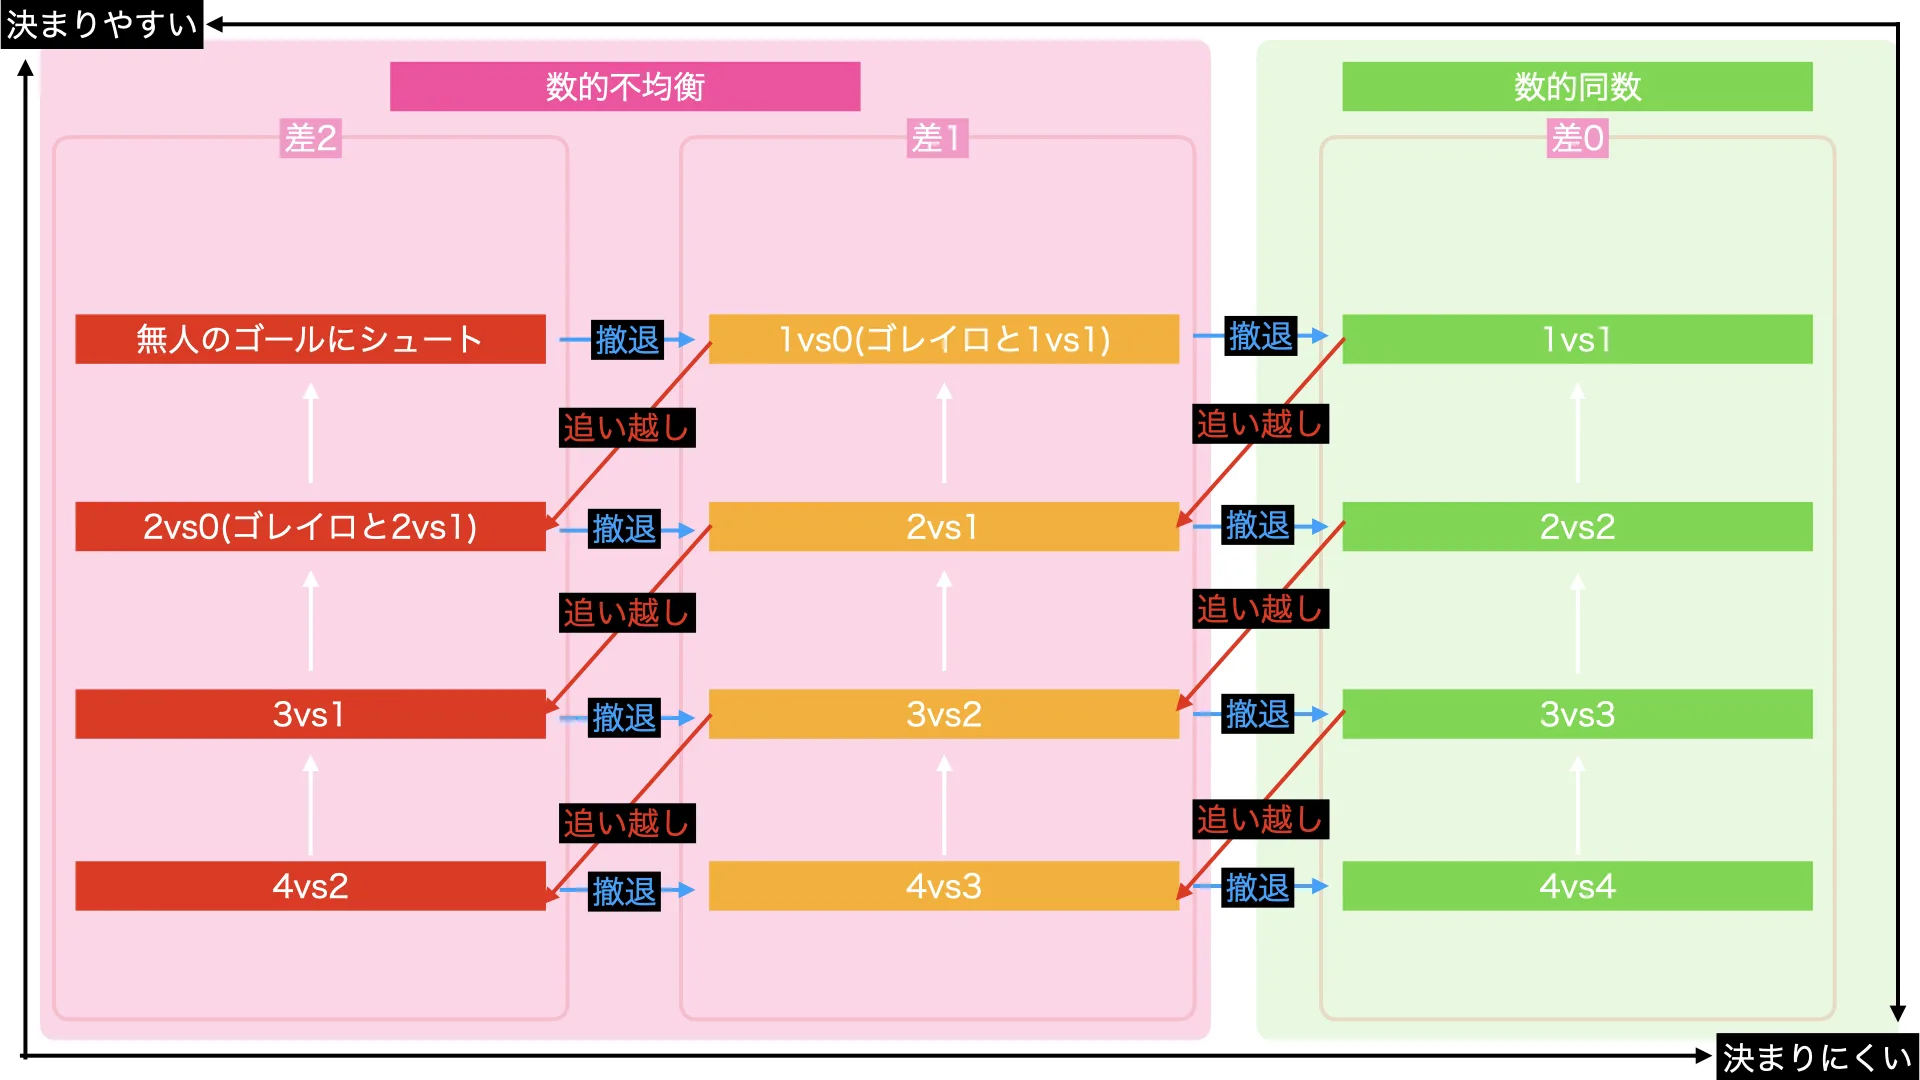
The 2v1 and 3v2 situations are the most common transition scenarios in futsal.
At first glance, these situations look easy to score from, but in reality they are surprisingly difficult.
In this article, I will explain the attacking and defensive principles of plus-one numerical imbalance, the most important transition scenario, covering 1v2 and 2v3 as a complete set.
The ideas explained here are universal principles that can be applied in many different environments, including casual pickup futsal, so if you understand these points alone, it will become much easier to make an impact in matches.
関連記事
Transitions: Overview
An overview of transitions in futsal. This article organizes the definition of the attacking and def…
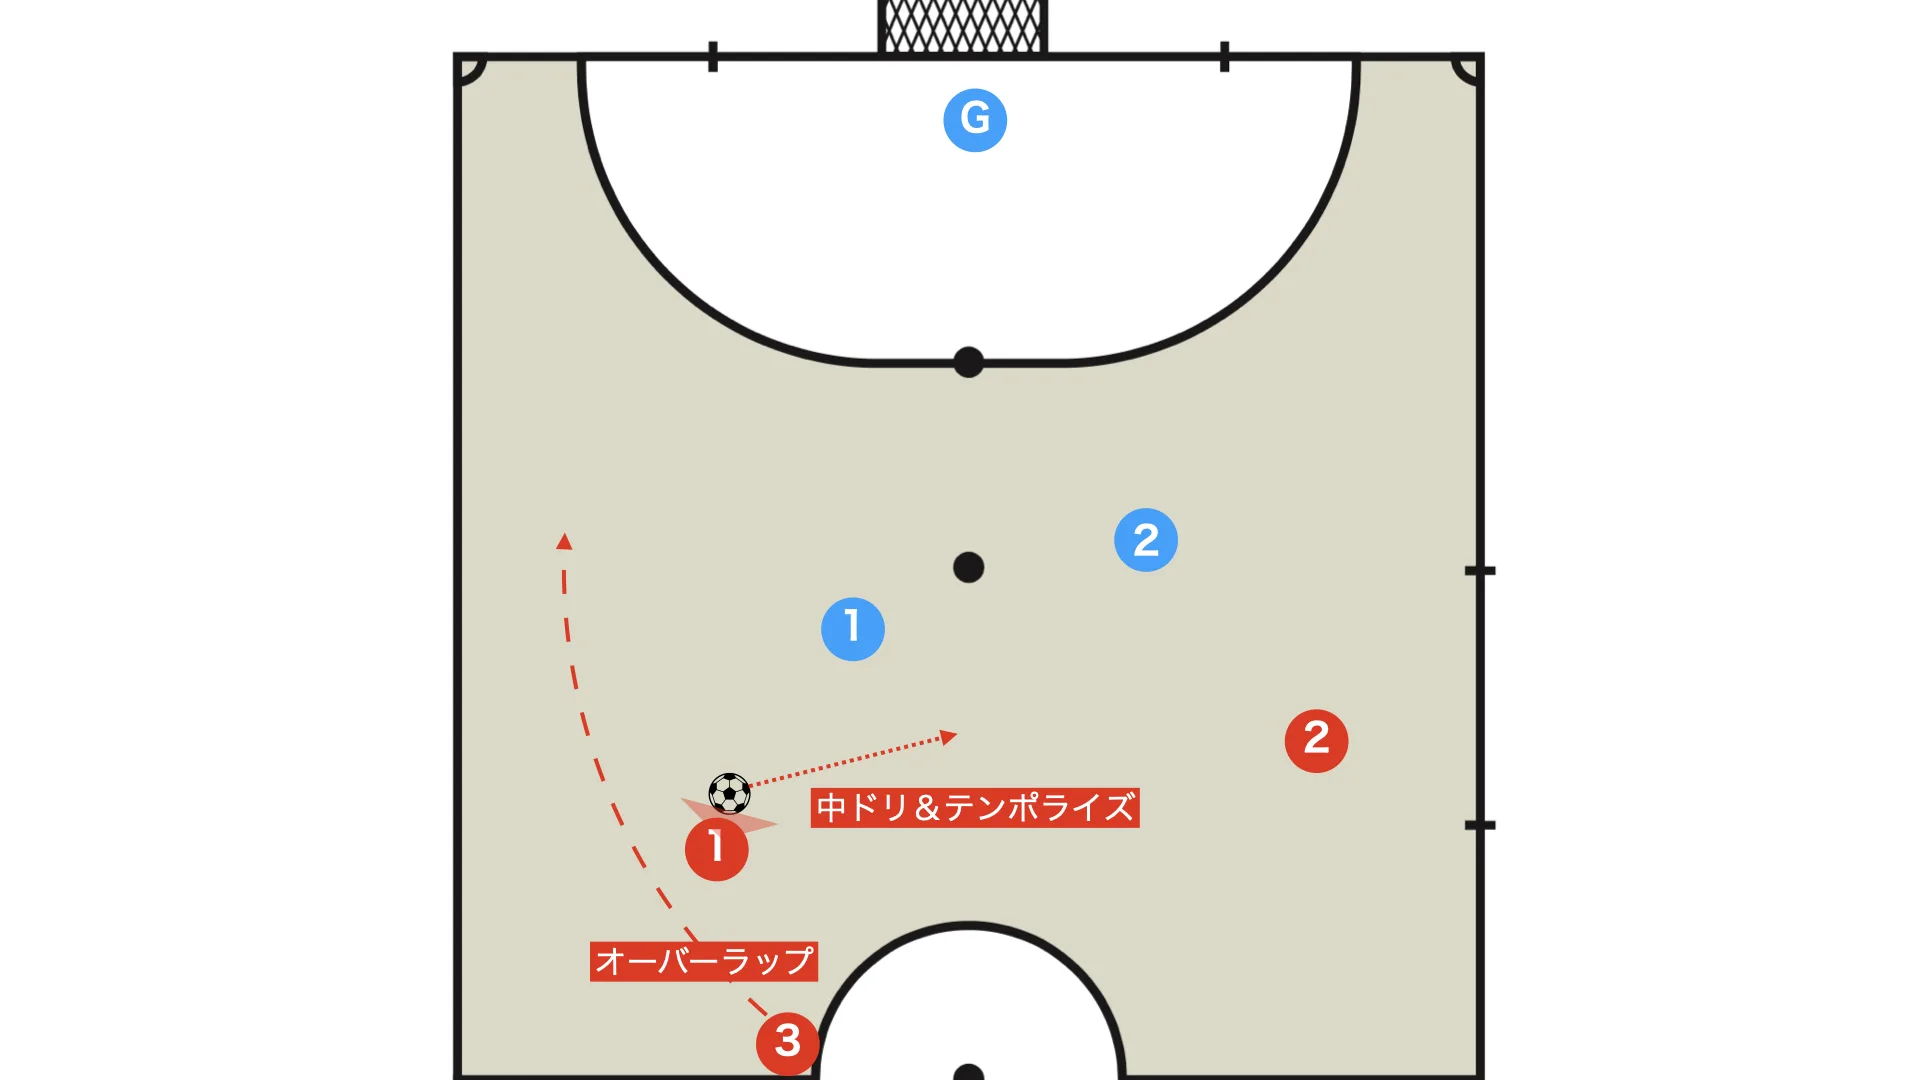
続きを読む →Before getting into 2v1 itself, I want to start by showing a situation where it is actually better to deliberately buy time and create a 3v1 instead.
If your teammate can overlap faster than the opponent can recover, it is better for the ball carrier to dribble inside while waiting for that overlap to arrive, in other words to temporize, and create a 3v1.
Once that happens, the situation has already shifted into a 3v1, so I will not go into the attacking and defensive details of 3v1 here.
If you want to learn more, read the article on transitions with a plus-two numerical imbalance (2v0 and 3v1).
関連記事

Transition: Numerical Superiority by Two (2vs0, 3vs1)
An explanation of futsal transition situations with a two-player numerical advantage (2vs0 and 3vs1)…
続きを読む →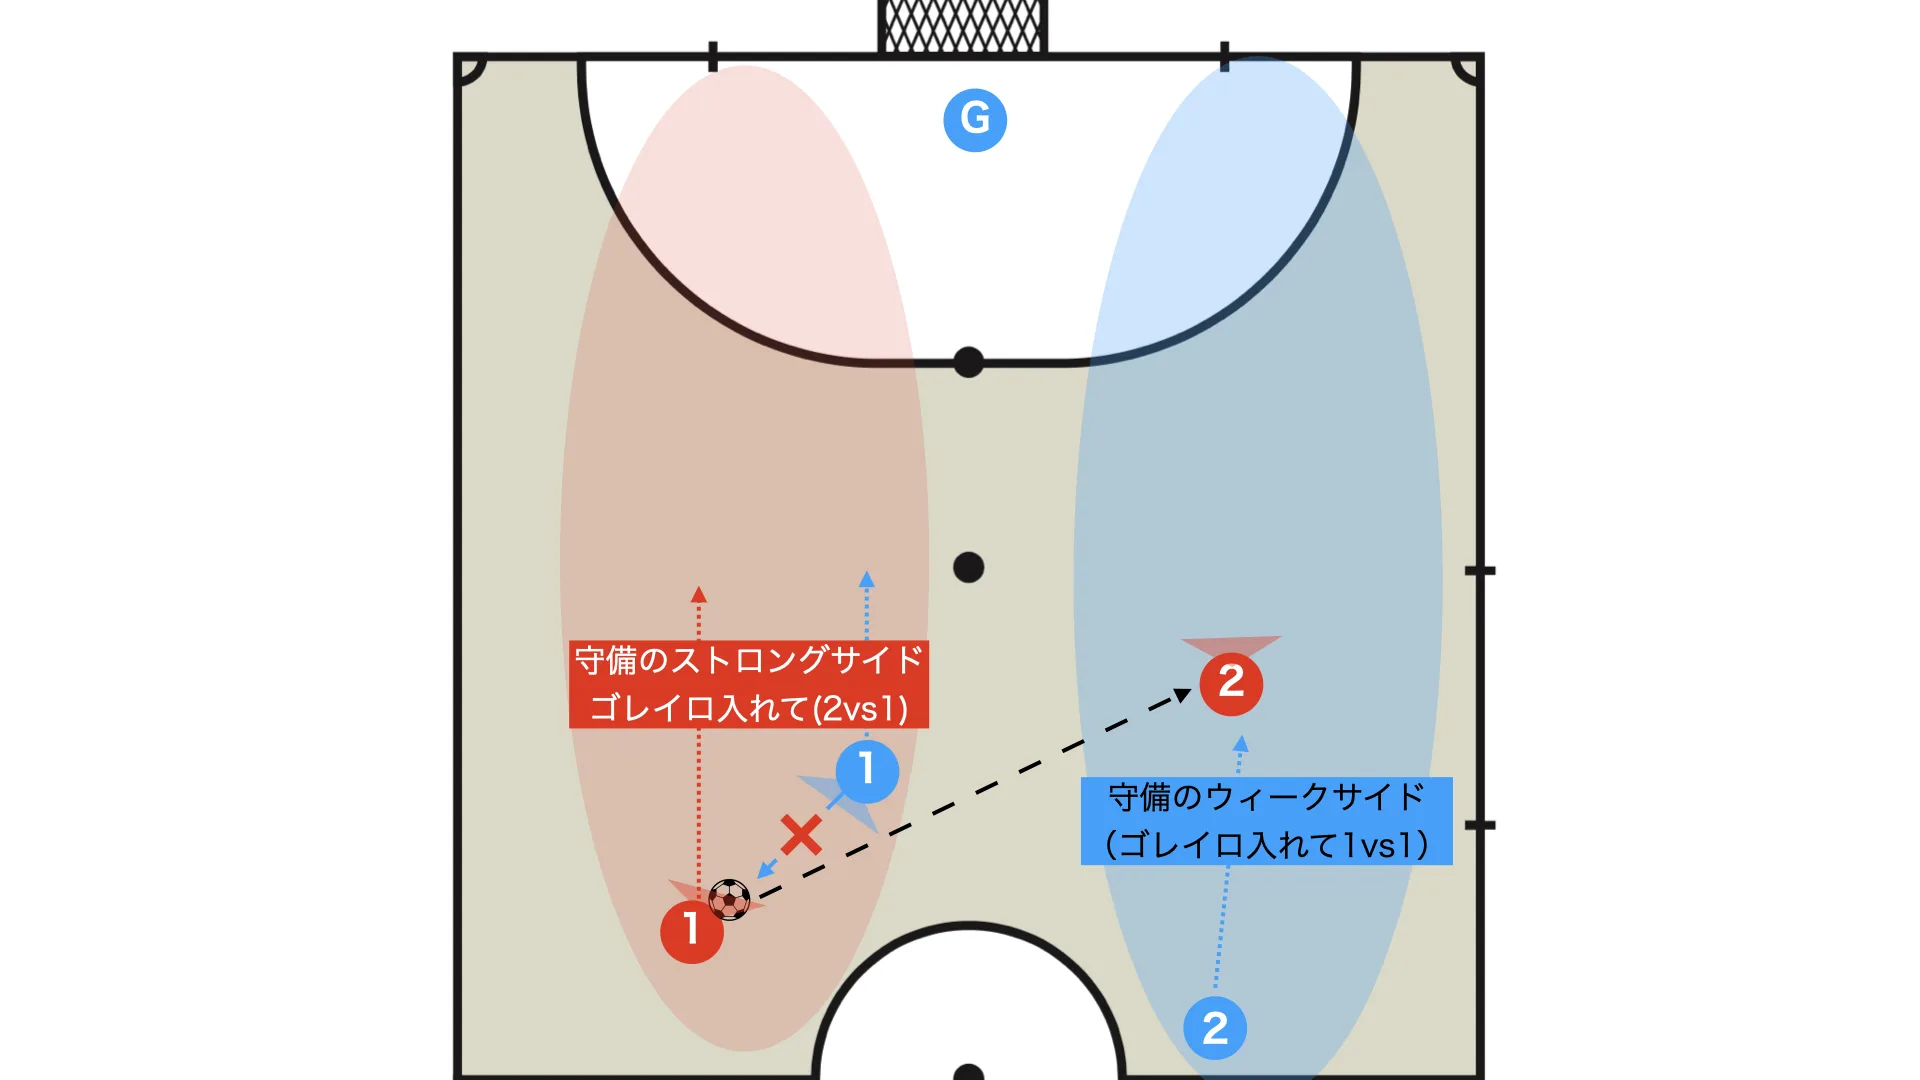
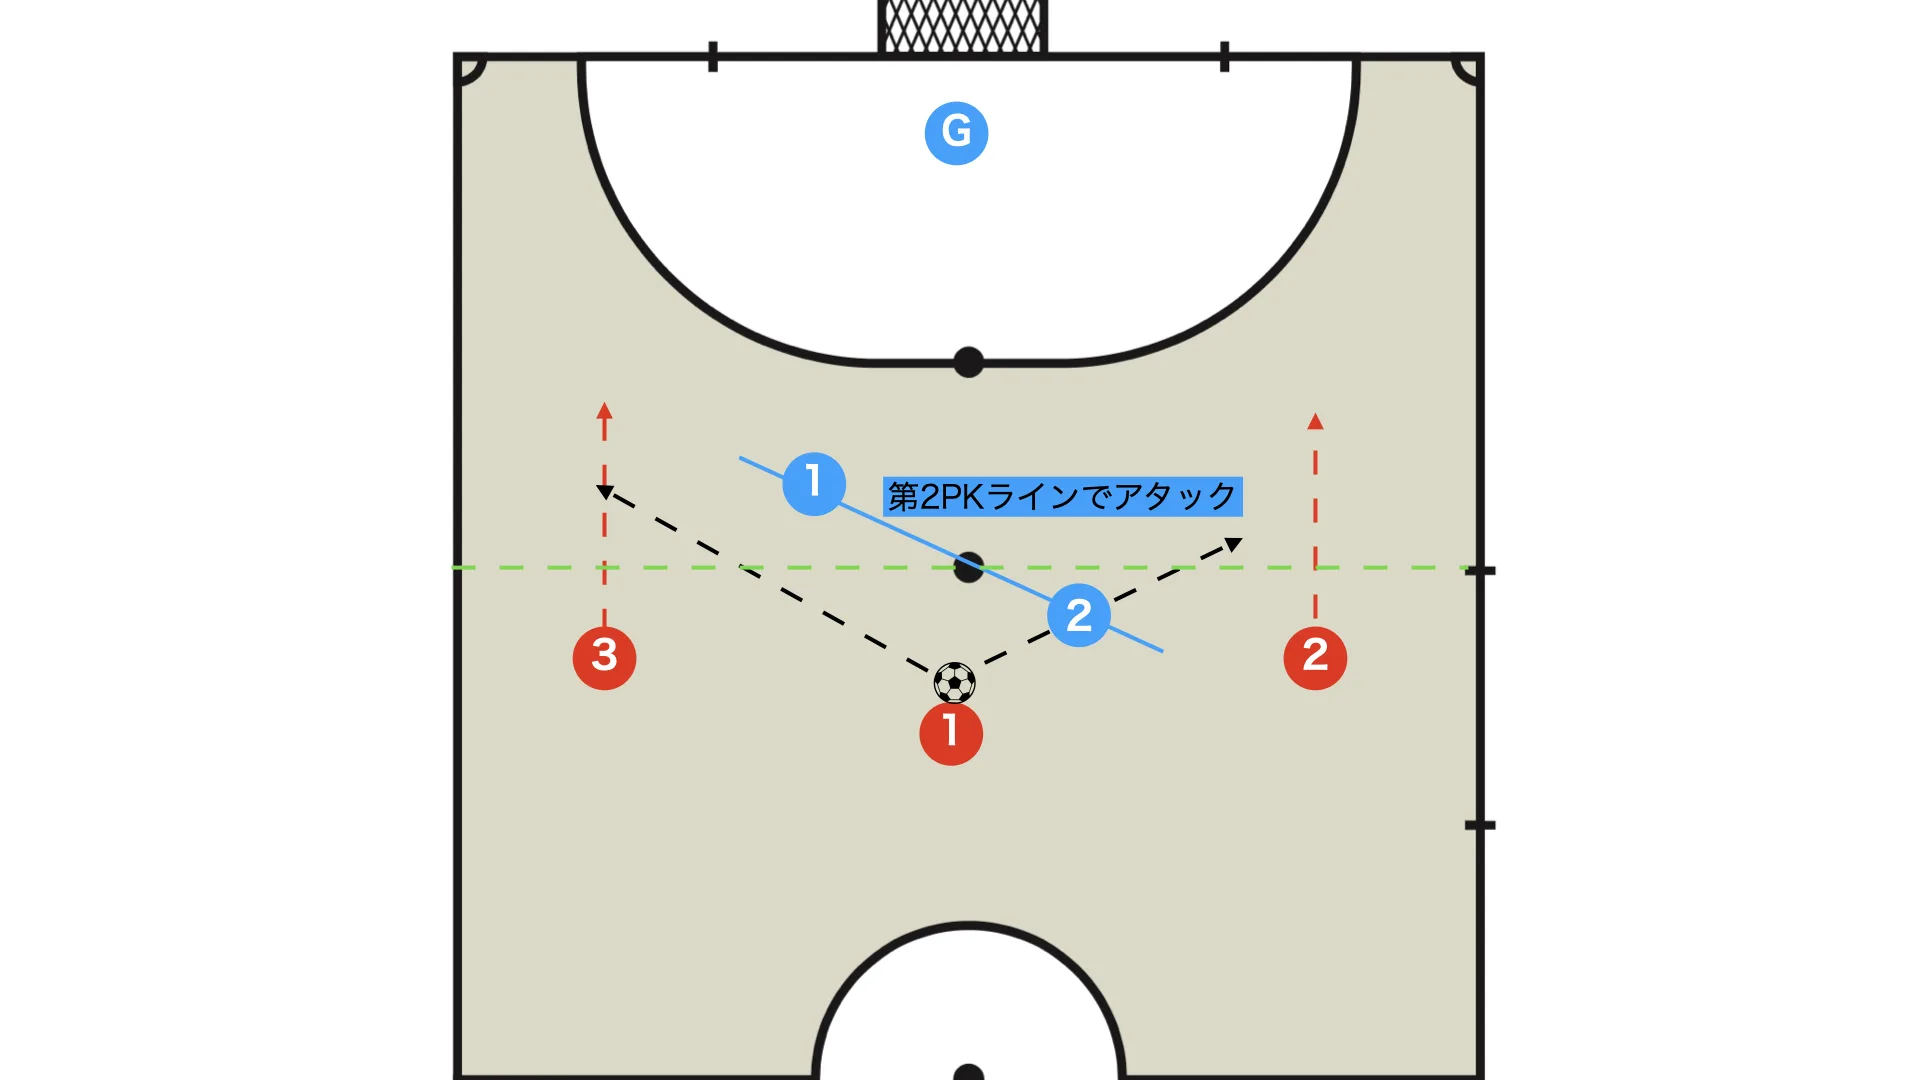
Defence
- Cut the passing lane to Red 2 and establish the defensive strong side
- Do not step out before the second penalty mark line; keep an appropriate distance and delay the attack (retreat)
- The nearest player (the defender) recovers toward the defensive weak side
Attack
- Run toward goal (do not drift toward the corner where the shooting angle disappears)
- Move the ball to the defensive weak side early
- The ball carrier must keep the option not only to pass but also to dribble forward
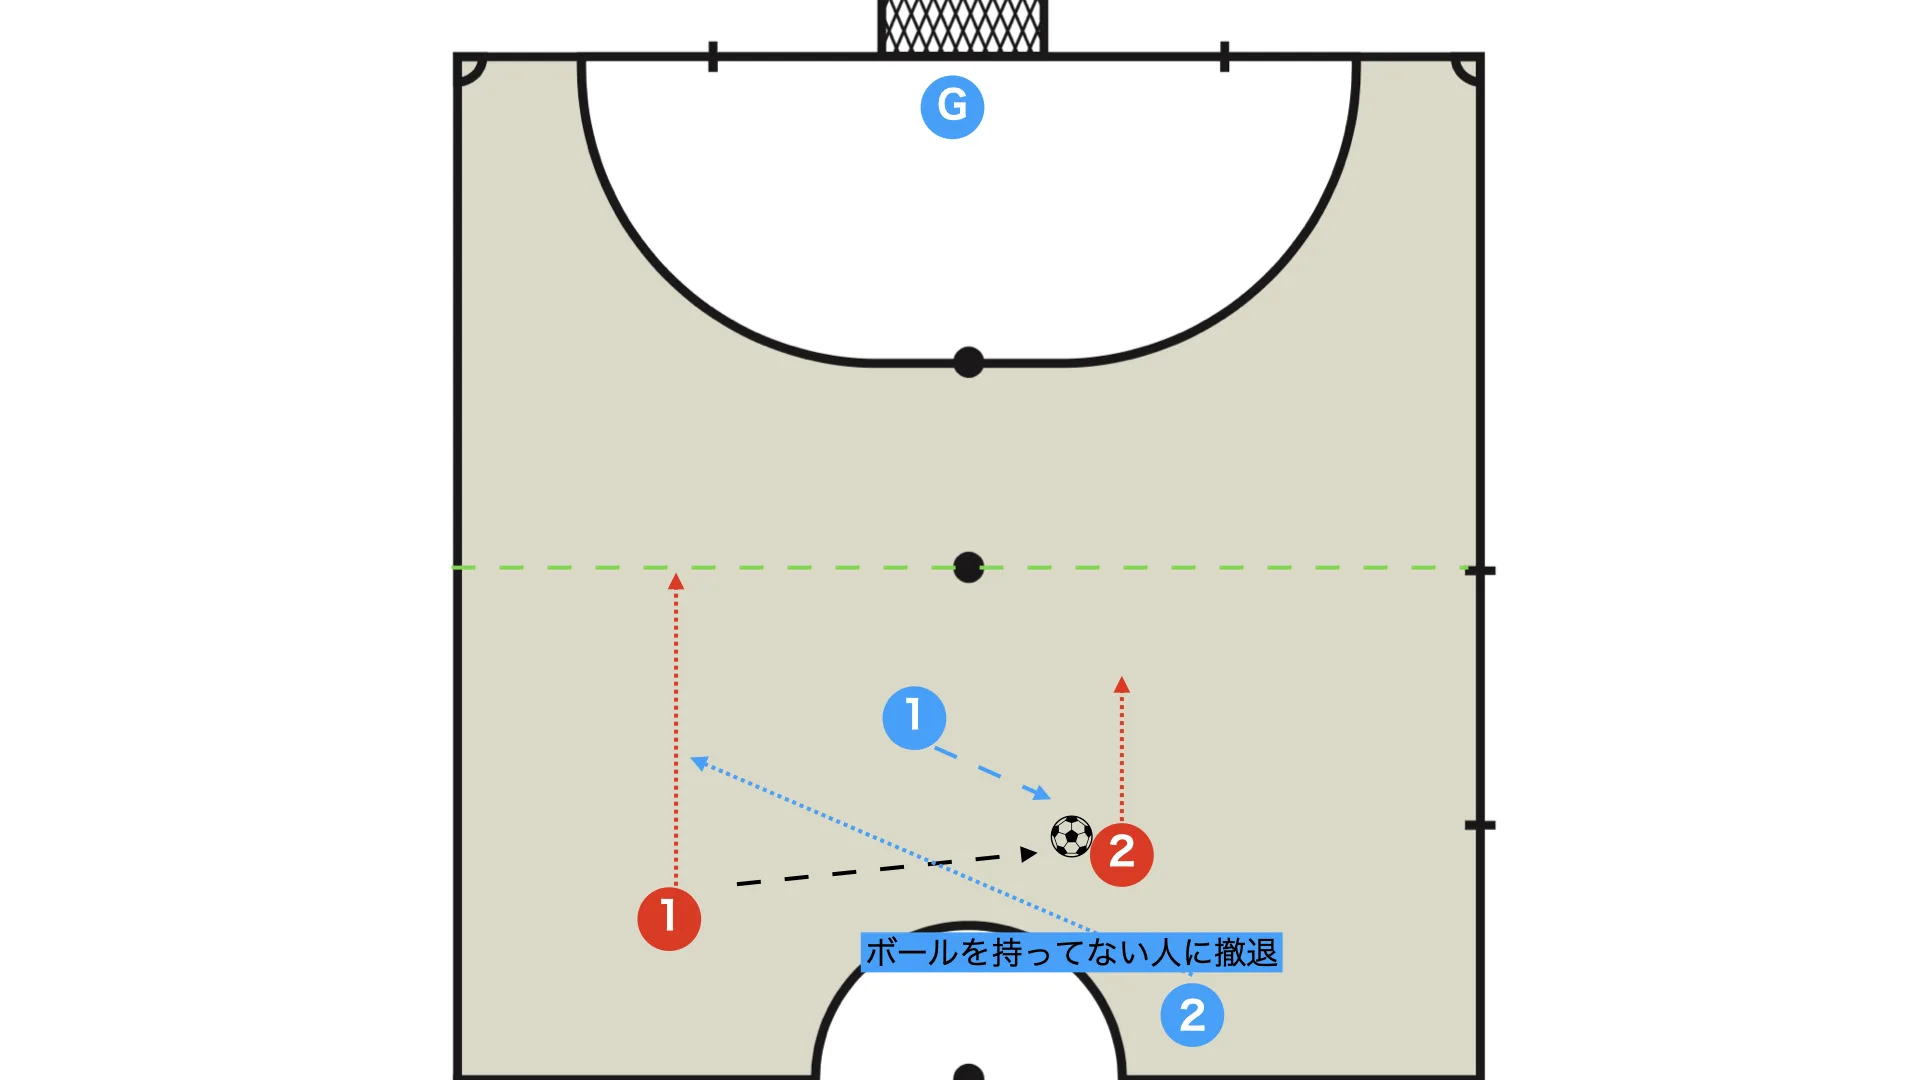
In the following situations, it is better for the defender to jump out again and press:
- A pass that does not advance play
- A short pass
- Poor pass quality (too weak, off target, or bouncing)
- A bad first touch
In that case, the defence rebuilds its strong side on the opposite side, so the recovering player also has to recover in the opposite direction.
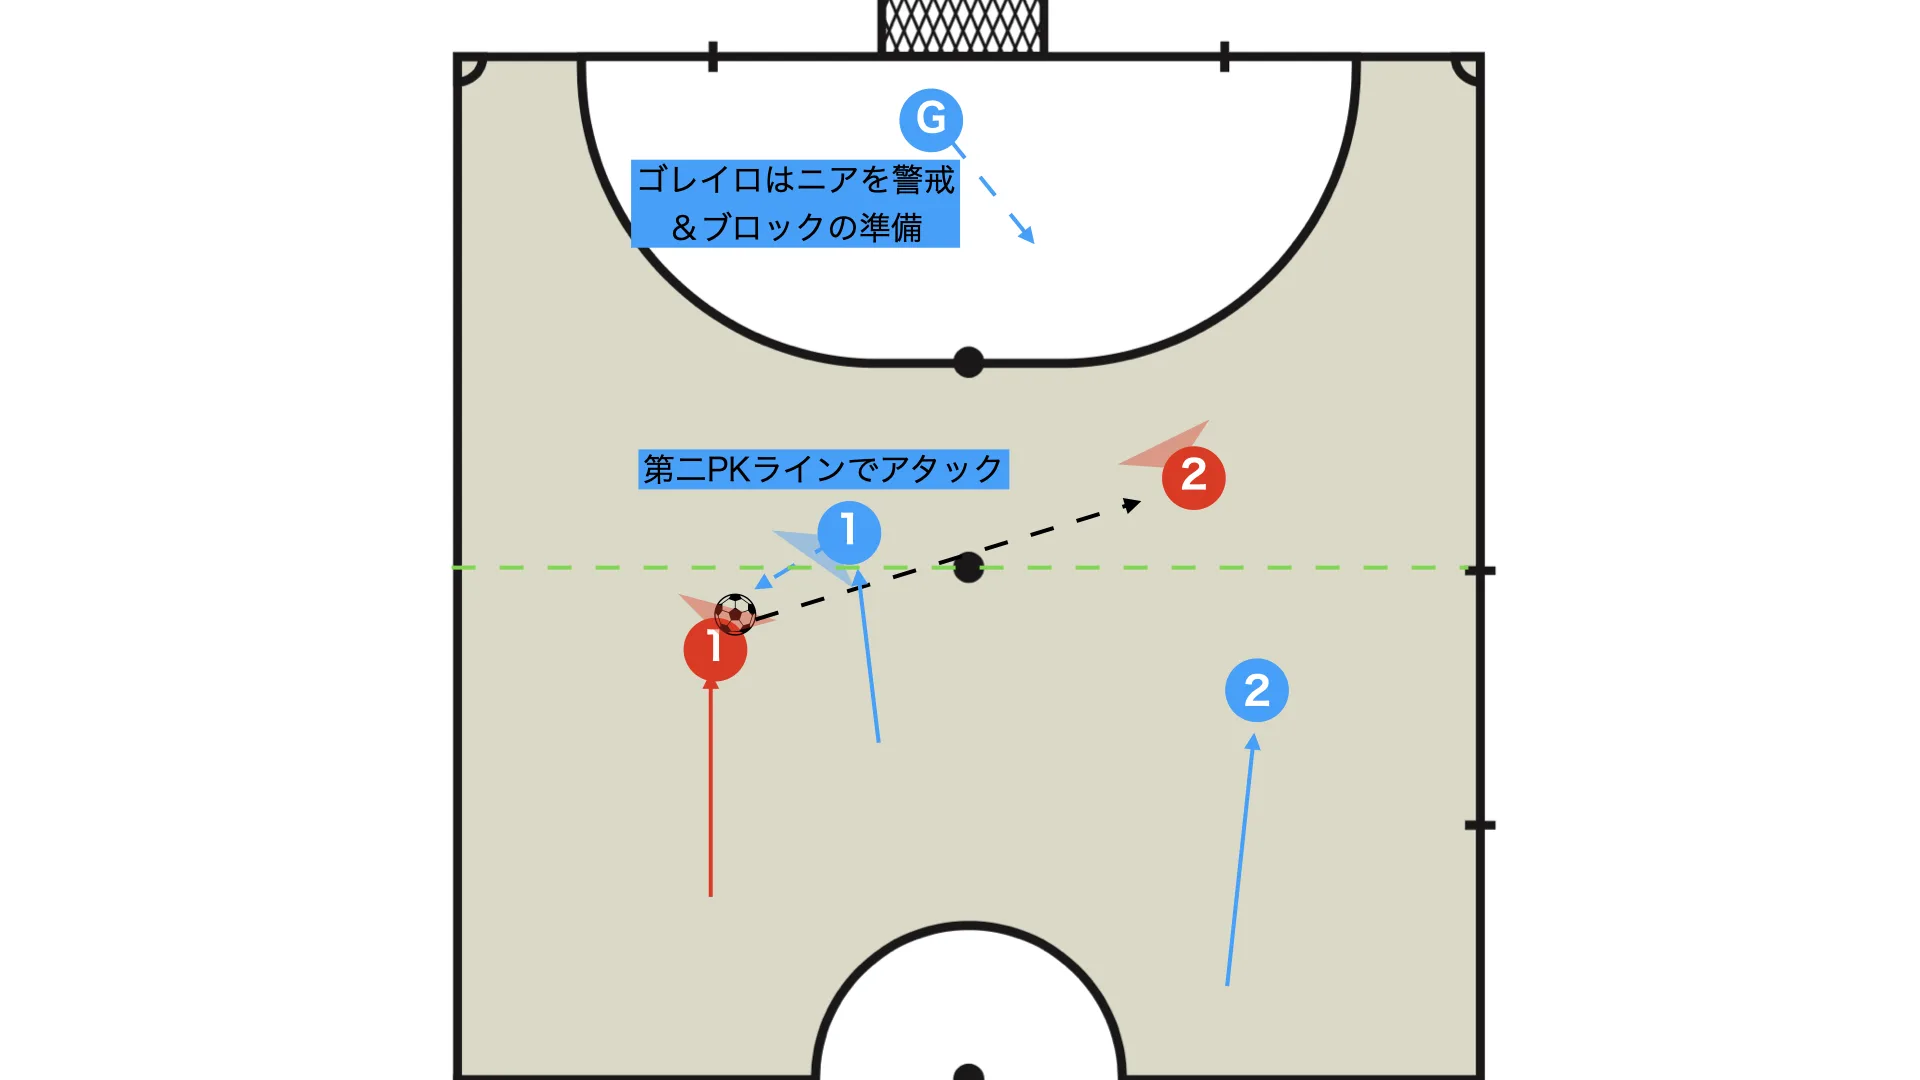
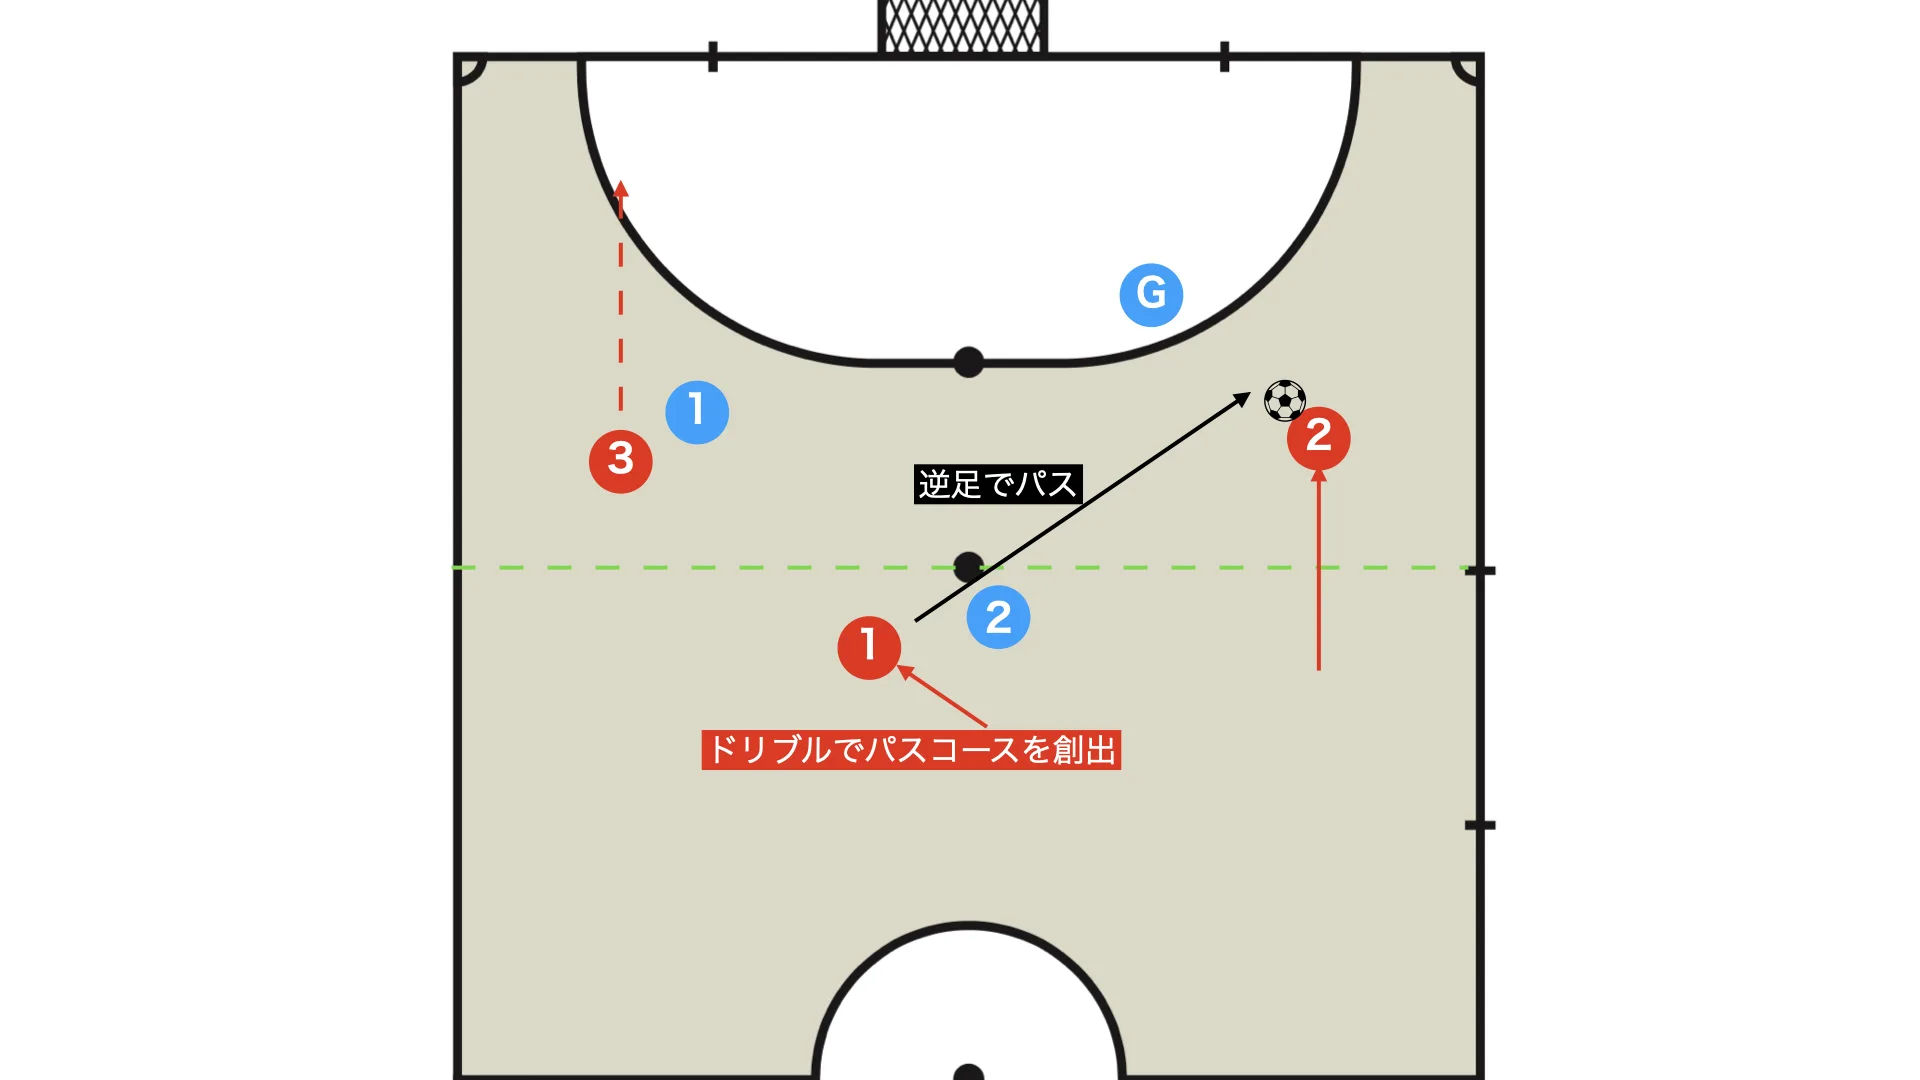
Defence
- Step out at the second penalty mark line
- The goalkeeper protects the near side against a direct drive and shot, while also being ready to come out and block if the ball is switched to the defensive weak side
Attack
- Always keep the option of going by yourself (driving vertically and looking for a second-post finish is effective)
- Create a duel between pass and dribble (for example, scissors into a vertical drive)
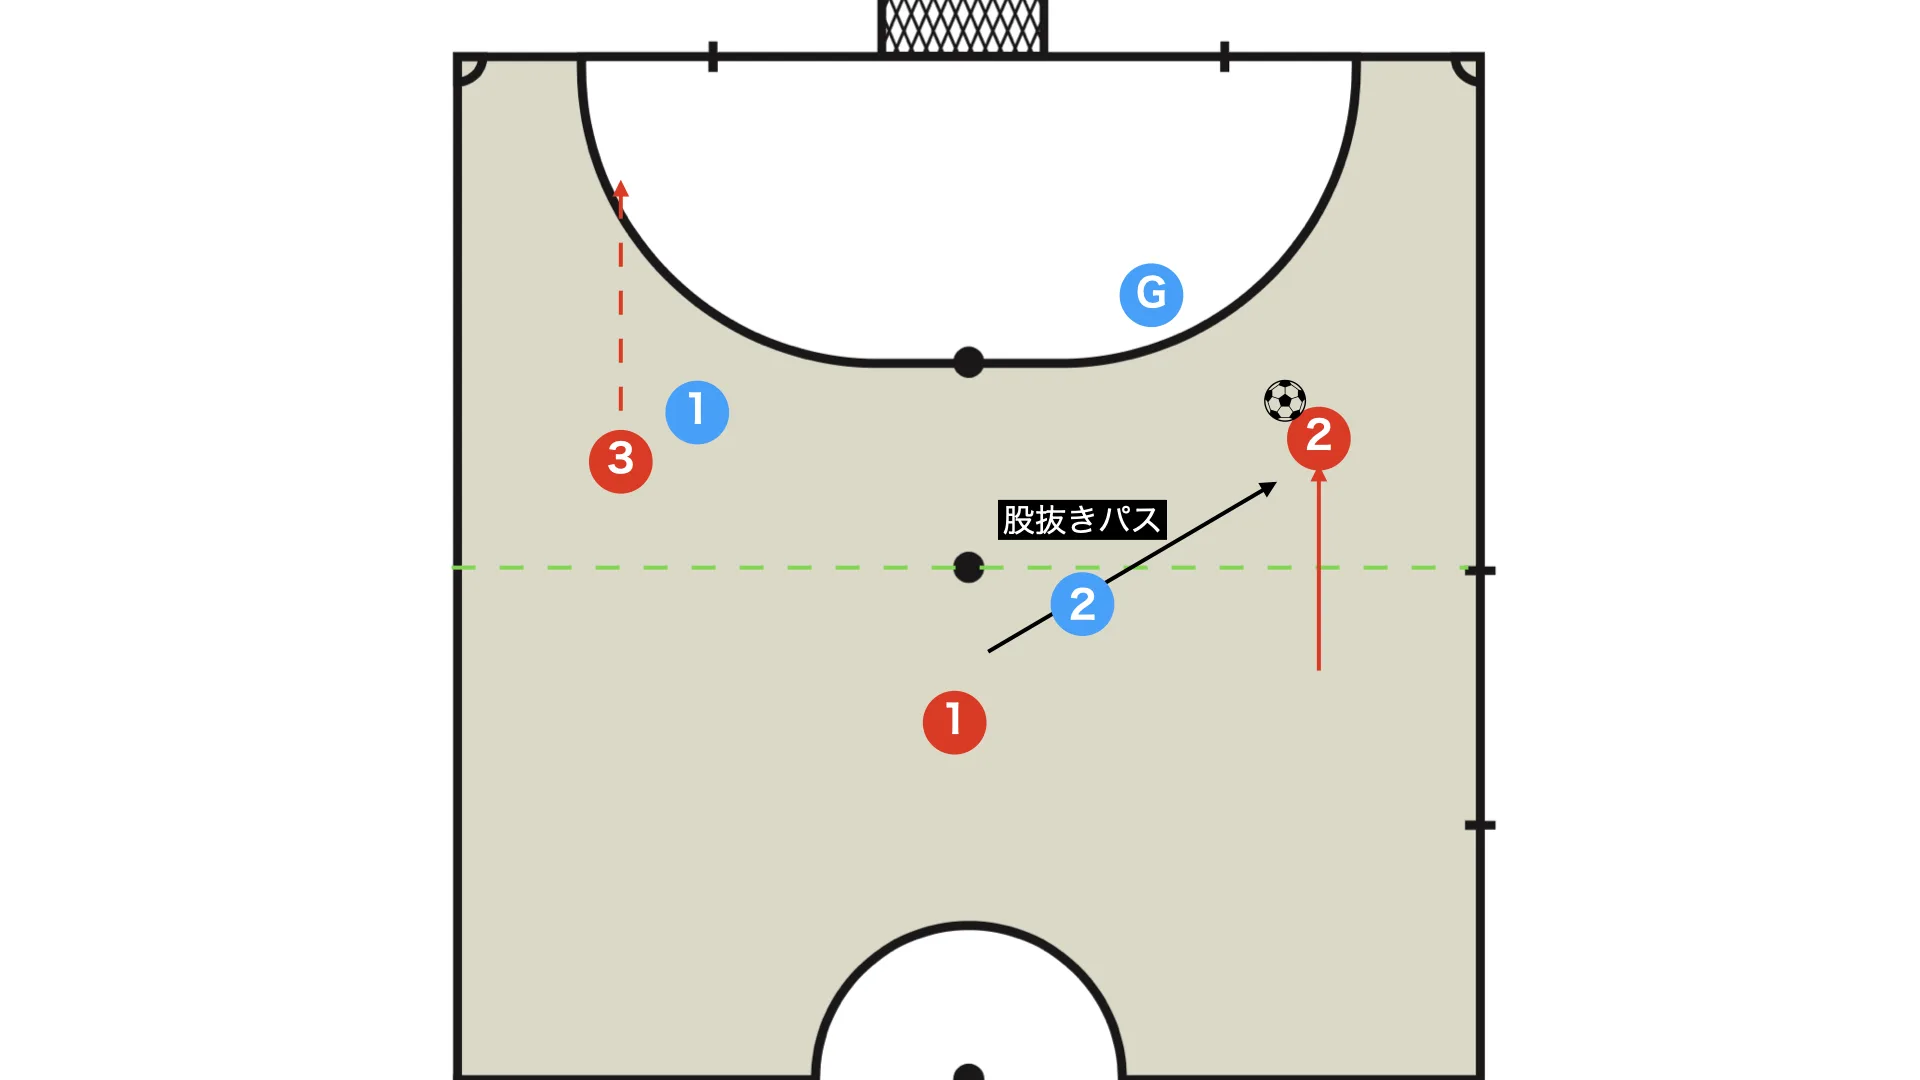
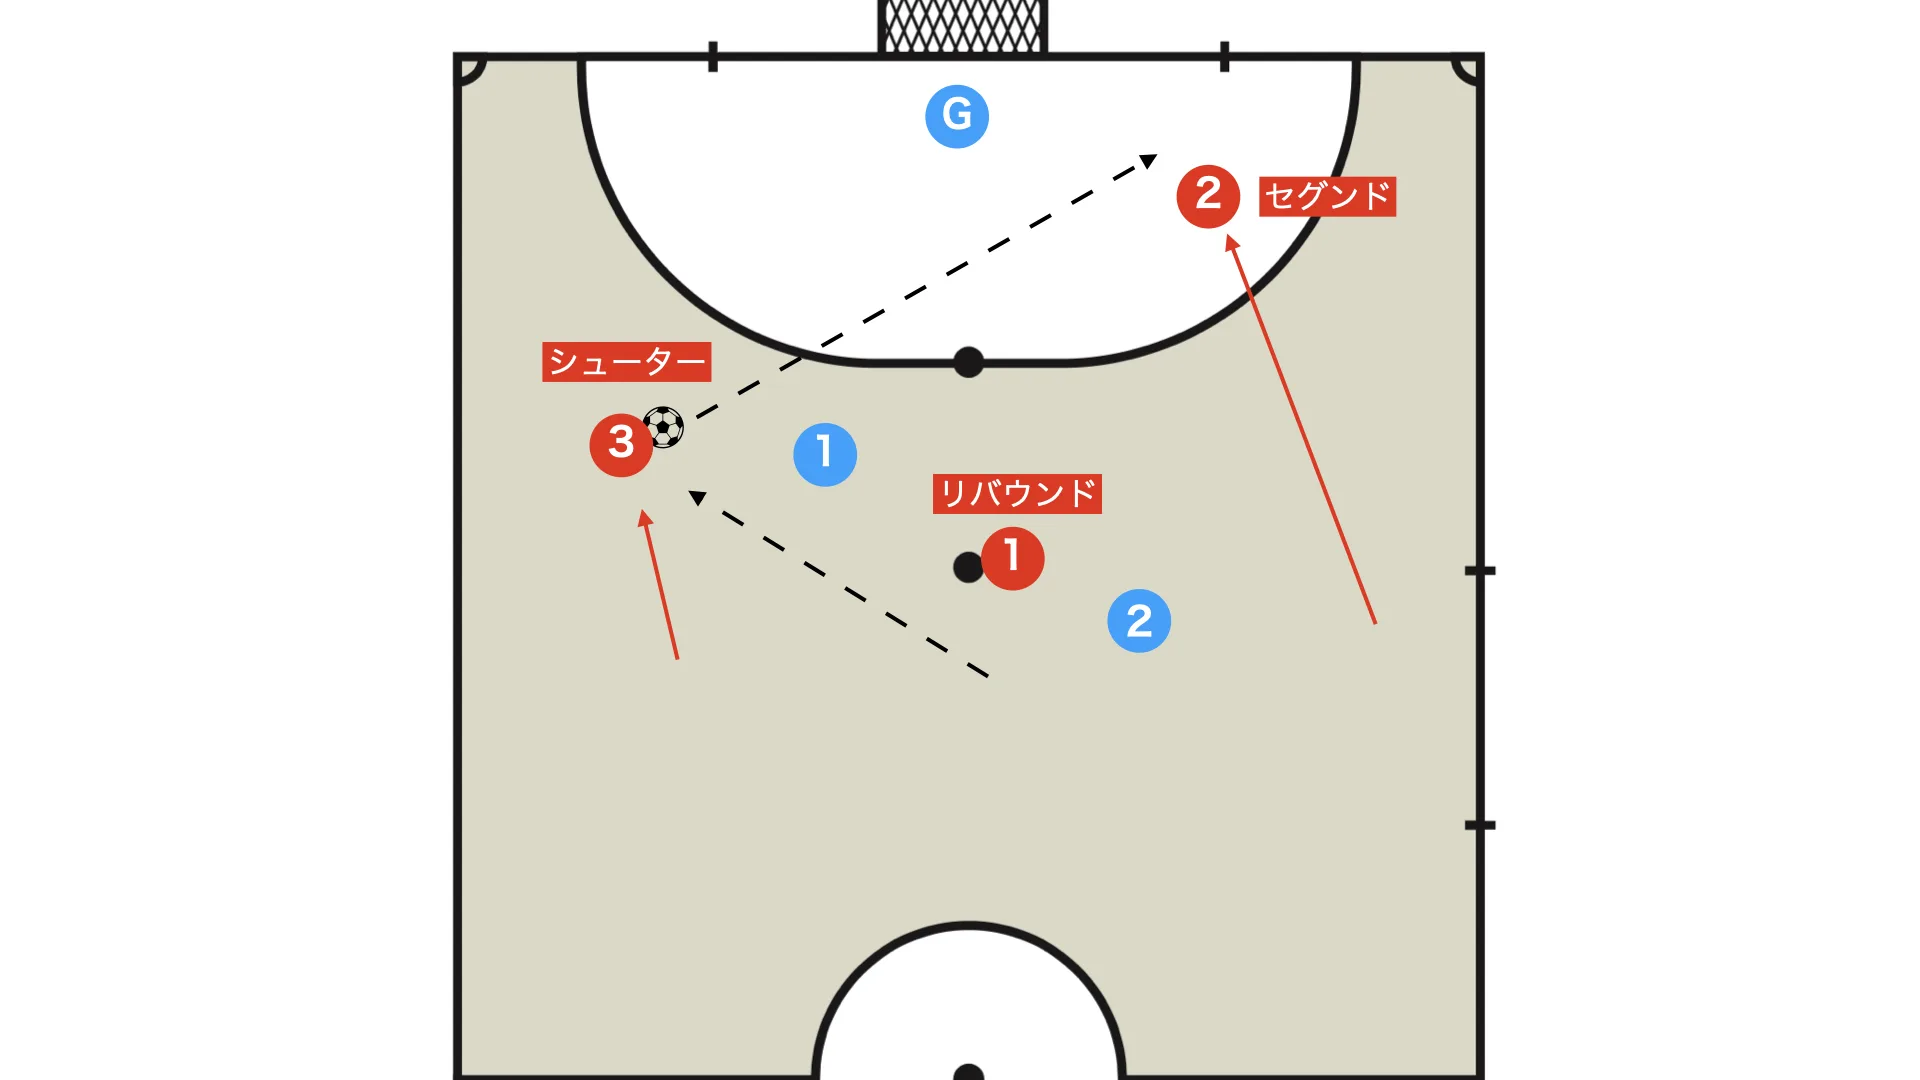
If the defence is exposed on the weak side and the attack gets beyond the second penalty mark line, the goalkeeper should come forward to narrow the shooting angle. (Block)
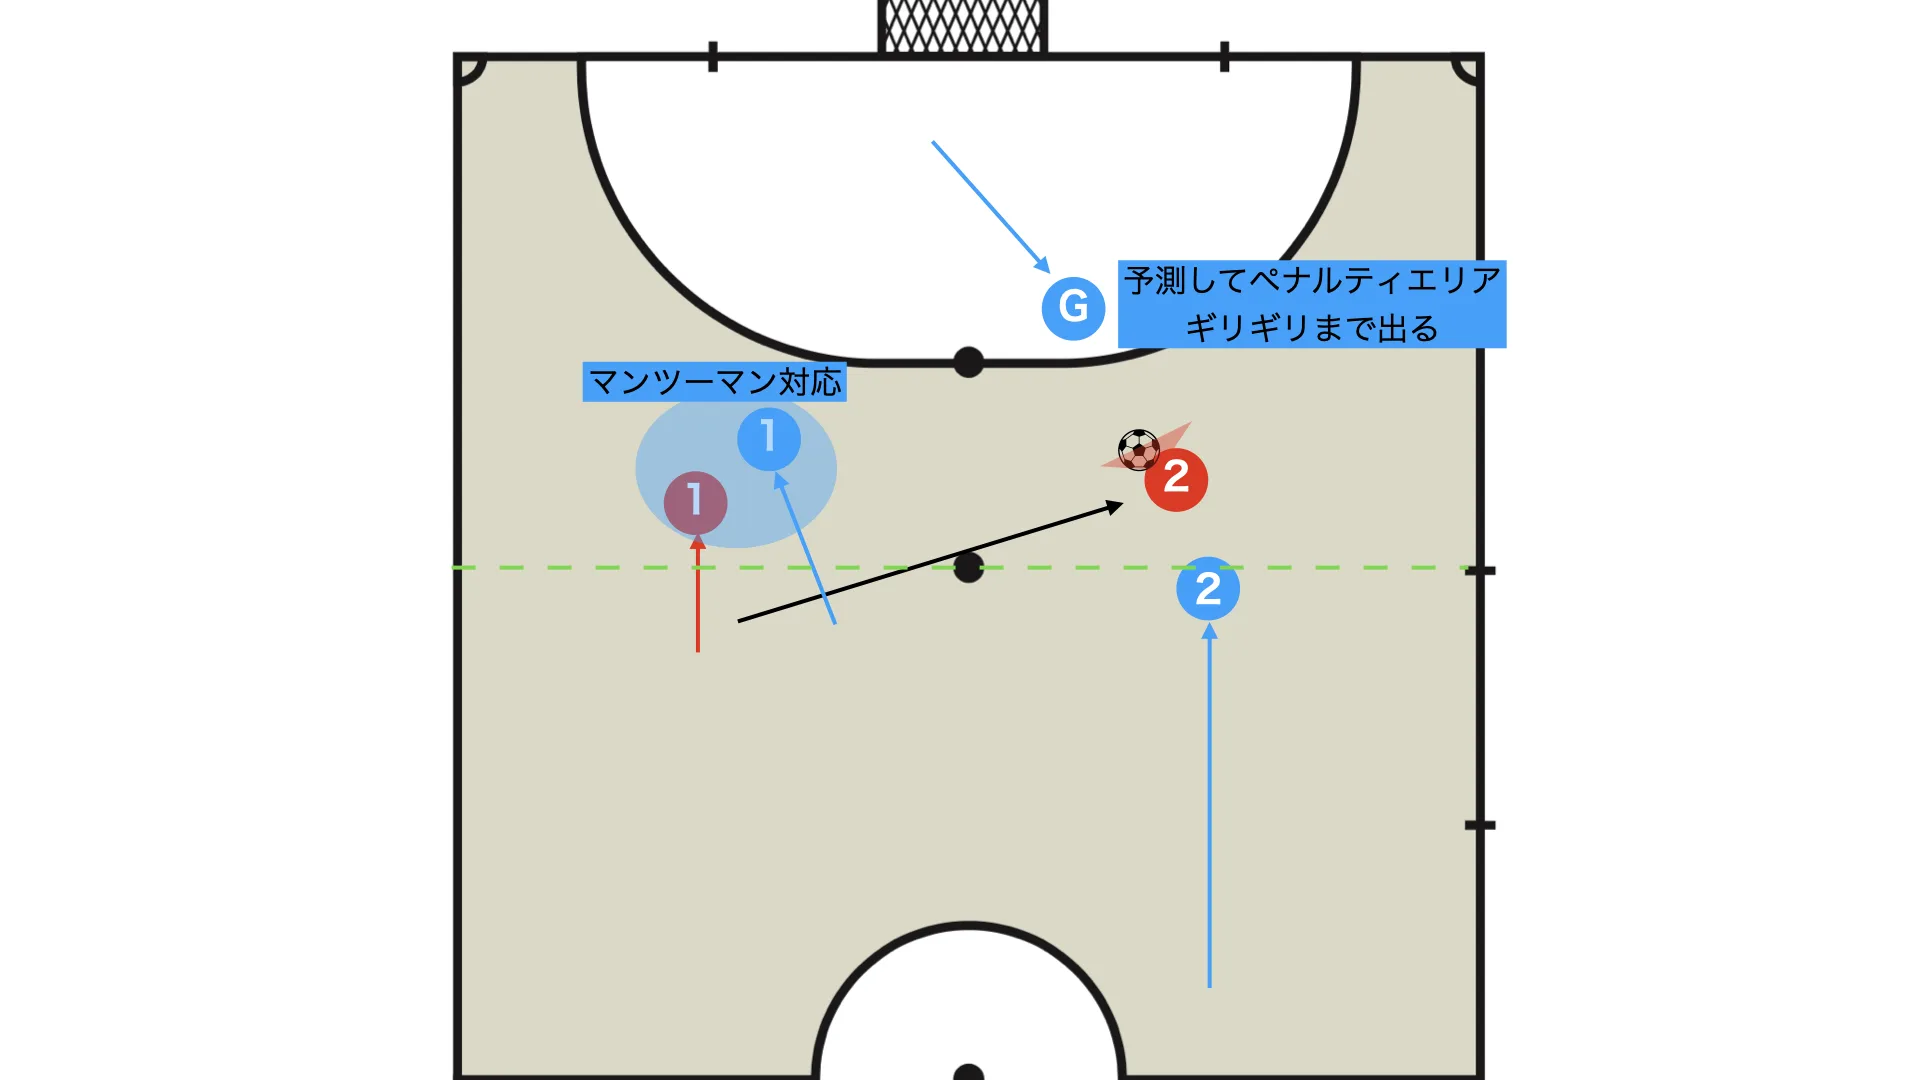
At that moment, Blue 1 marks Red 1 man to man. (Face guard)
Why is it called face guarding?
By reading the opponent's face and eye line, you can anticipate where they are about to move next, so this type of marking is called face guarding because you defend while watching the opponent's face.
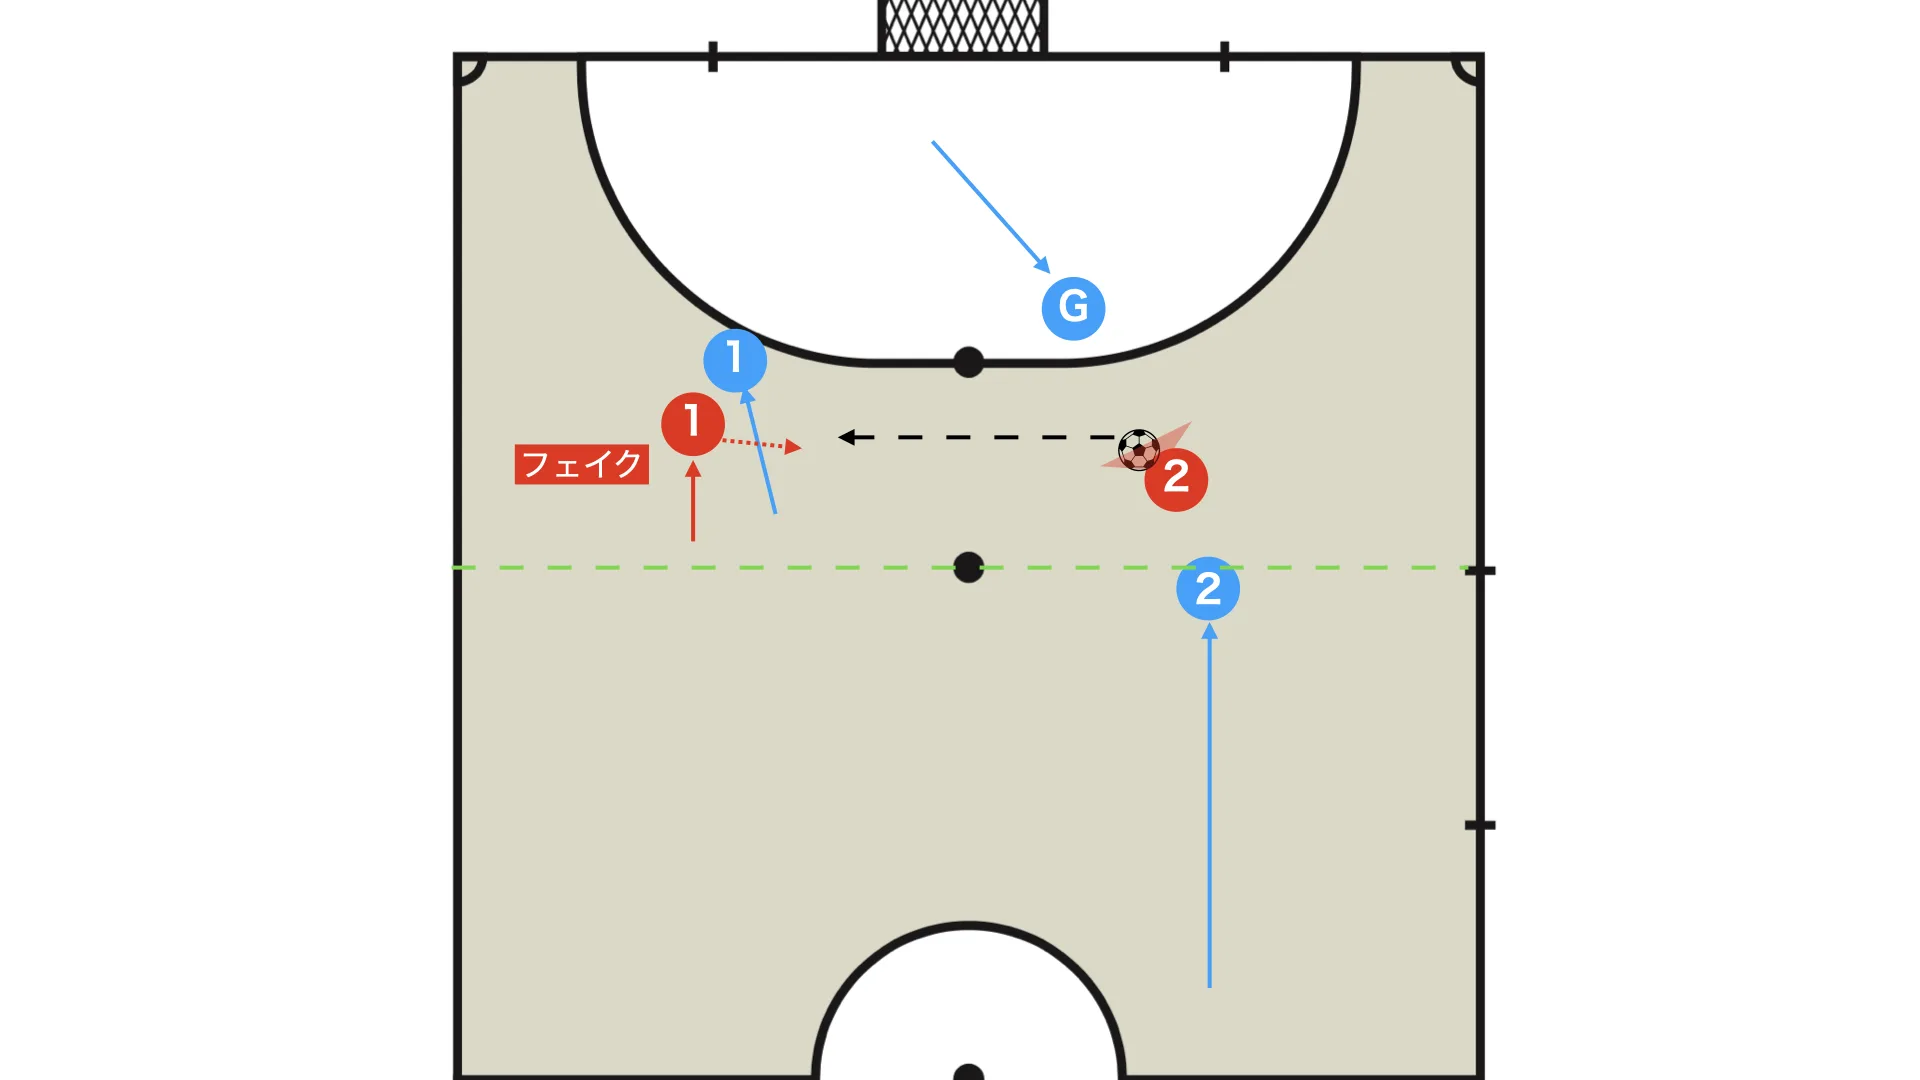
The opposing defender expects their mark to run toward the second post and follows that run, so you can use that expectation against them by faking the movement and instead giving horizontal support to your teammate, allowing a free shot into an empty goal.
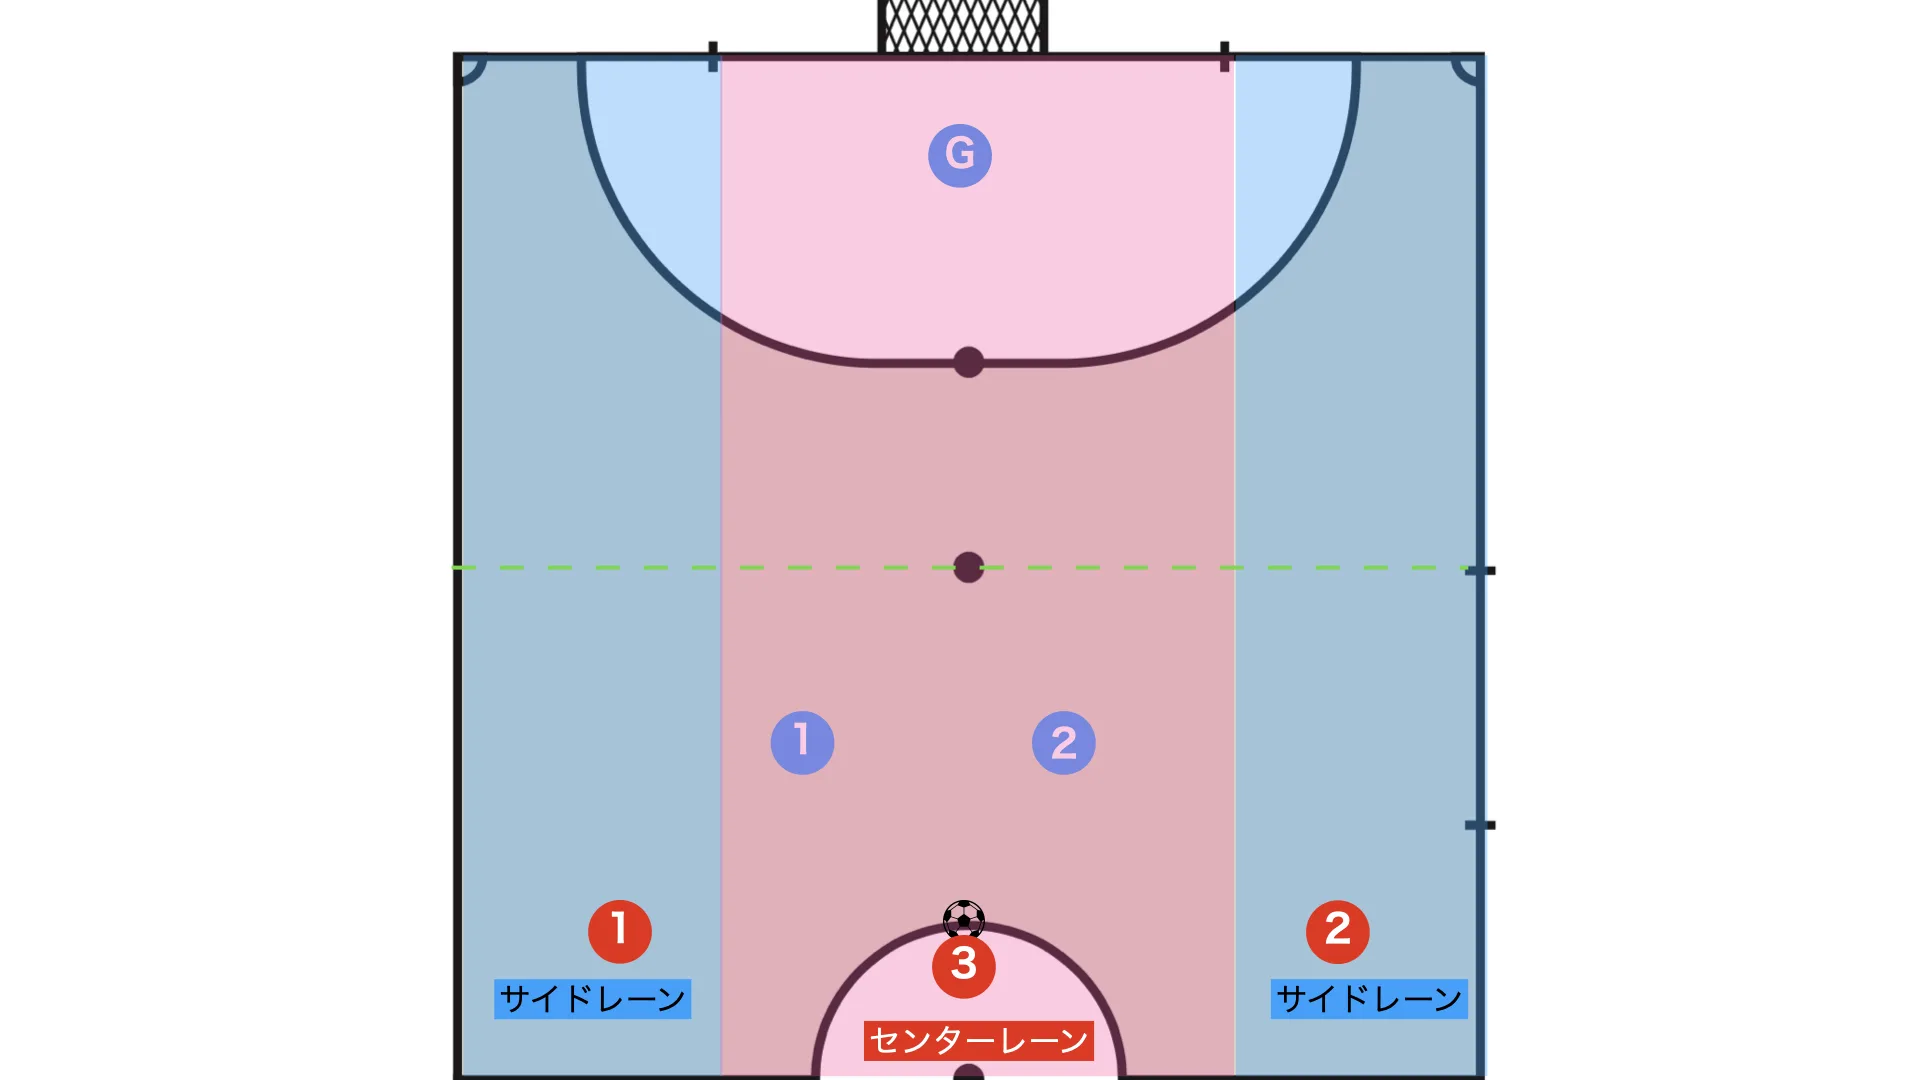
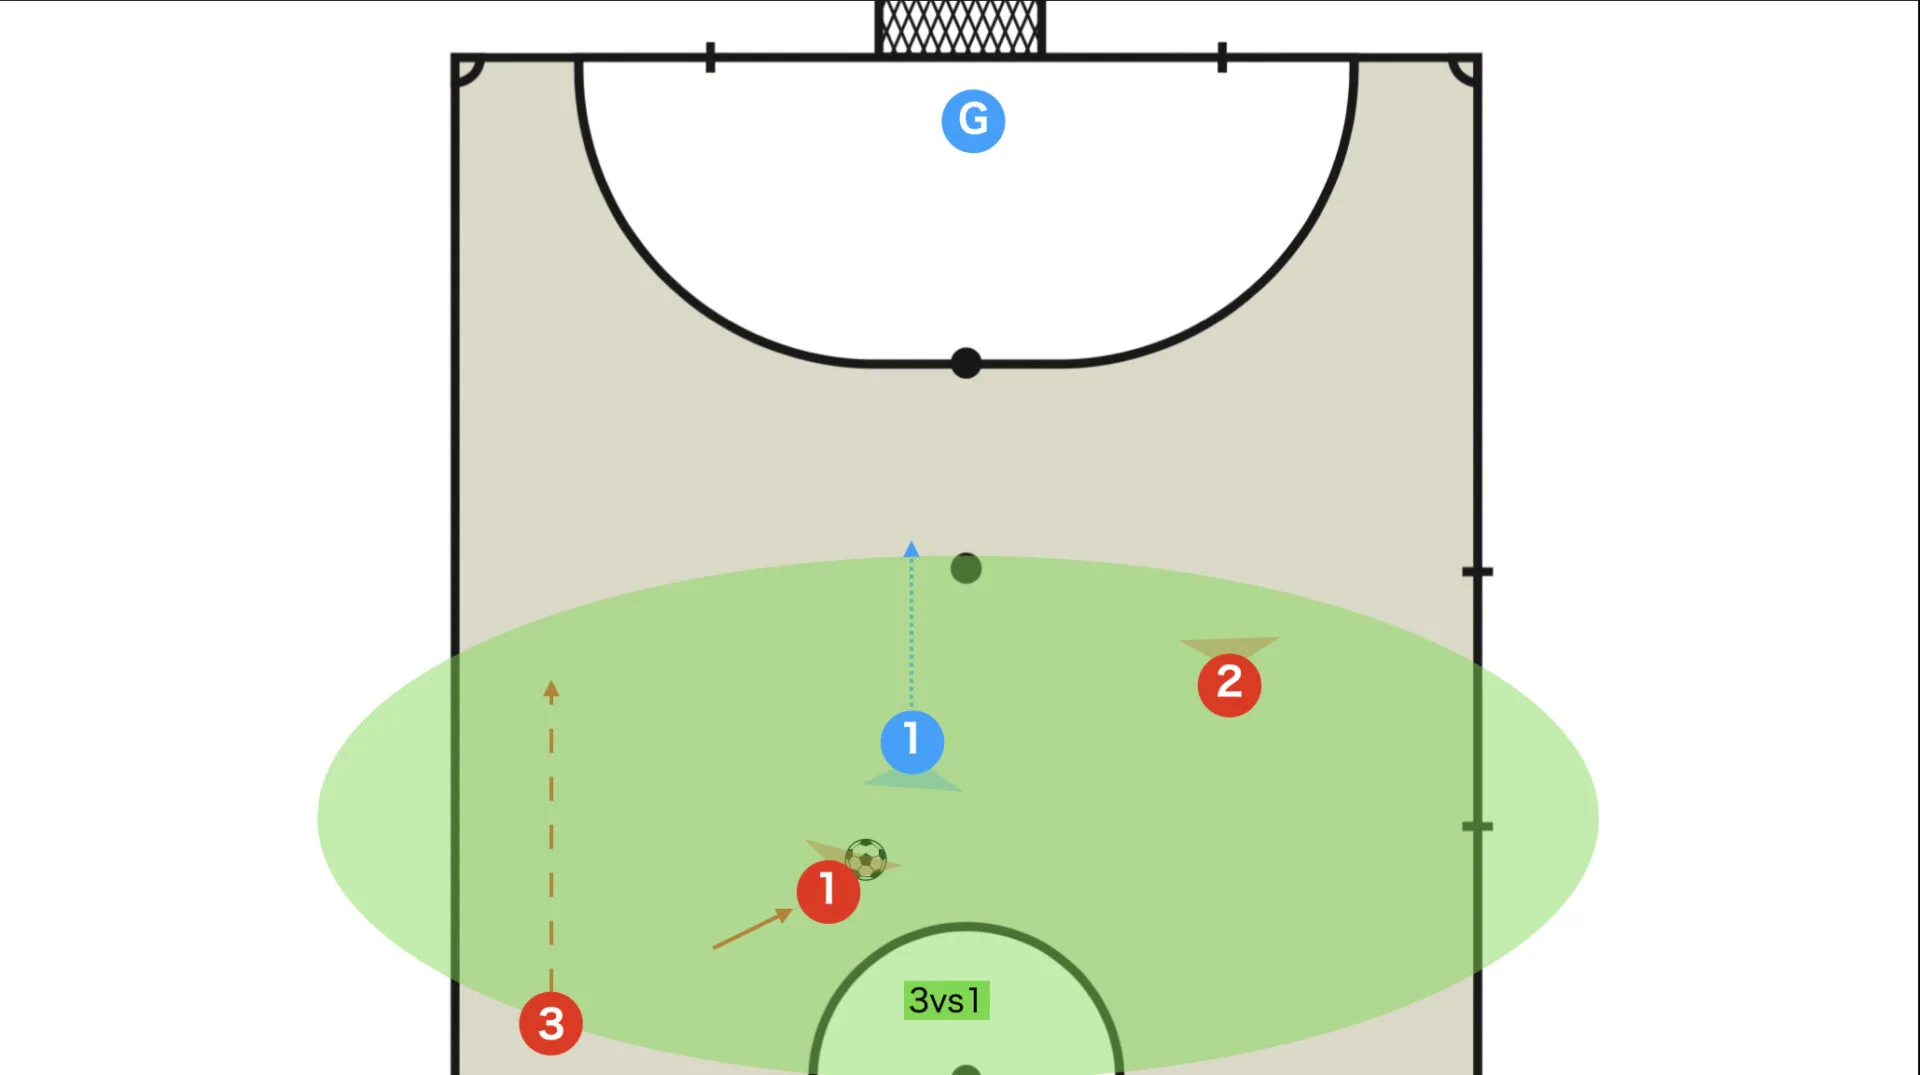
Attacking principles
- Occupy the three lanes with one player in each: both side lanes and the center lane
- The ball must be in the center lane (if it starts wide, carry it inside) so you keep passing lanes open to both sides
- The wide players should overtake the central ball carrier so they can receive a forward pass
- The two wide players must be careful not to drift toward the corner where the shooting angle disappears (once they get beyond the second penalty mark line, they should run toward the goalpost)
Defence
Use two players to close the center lane (while being aware of the distance between them)
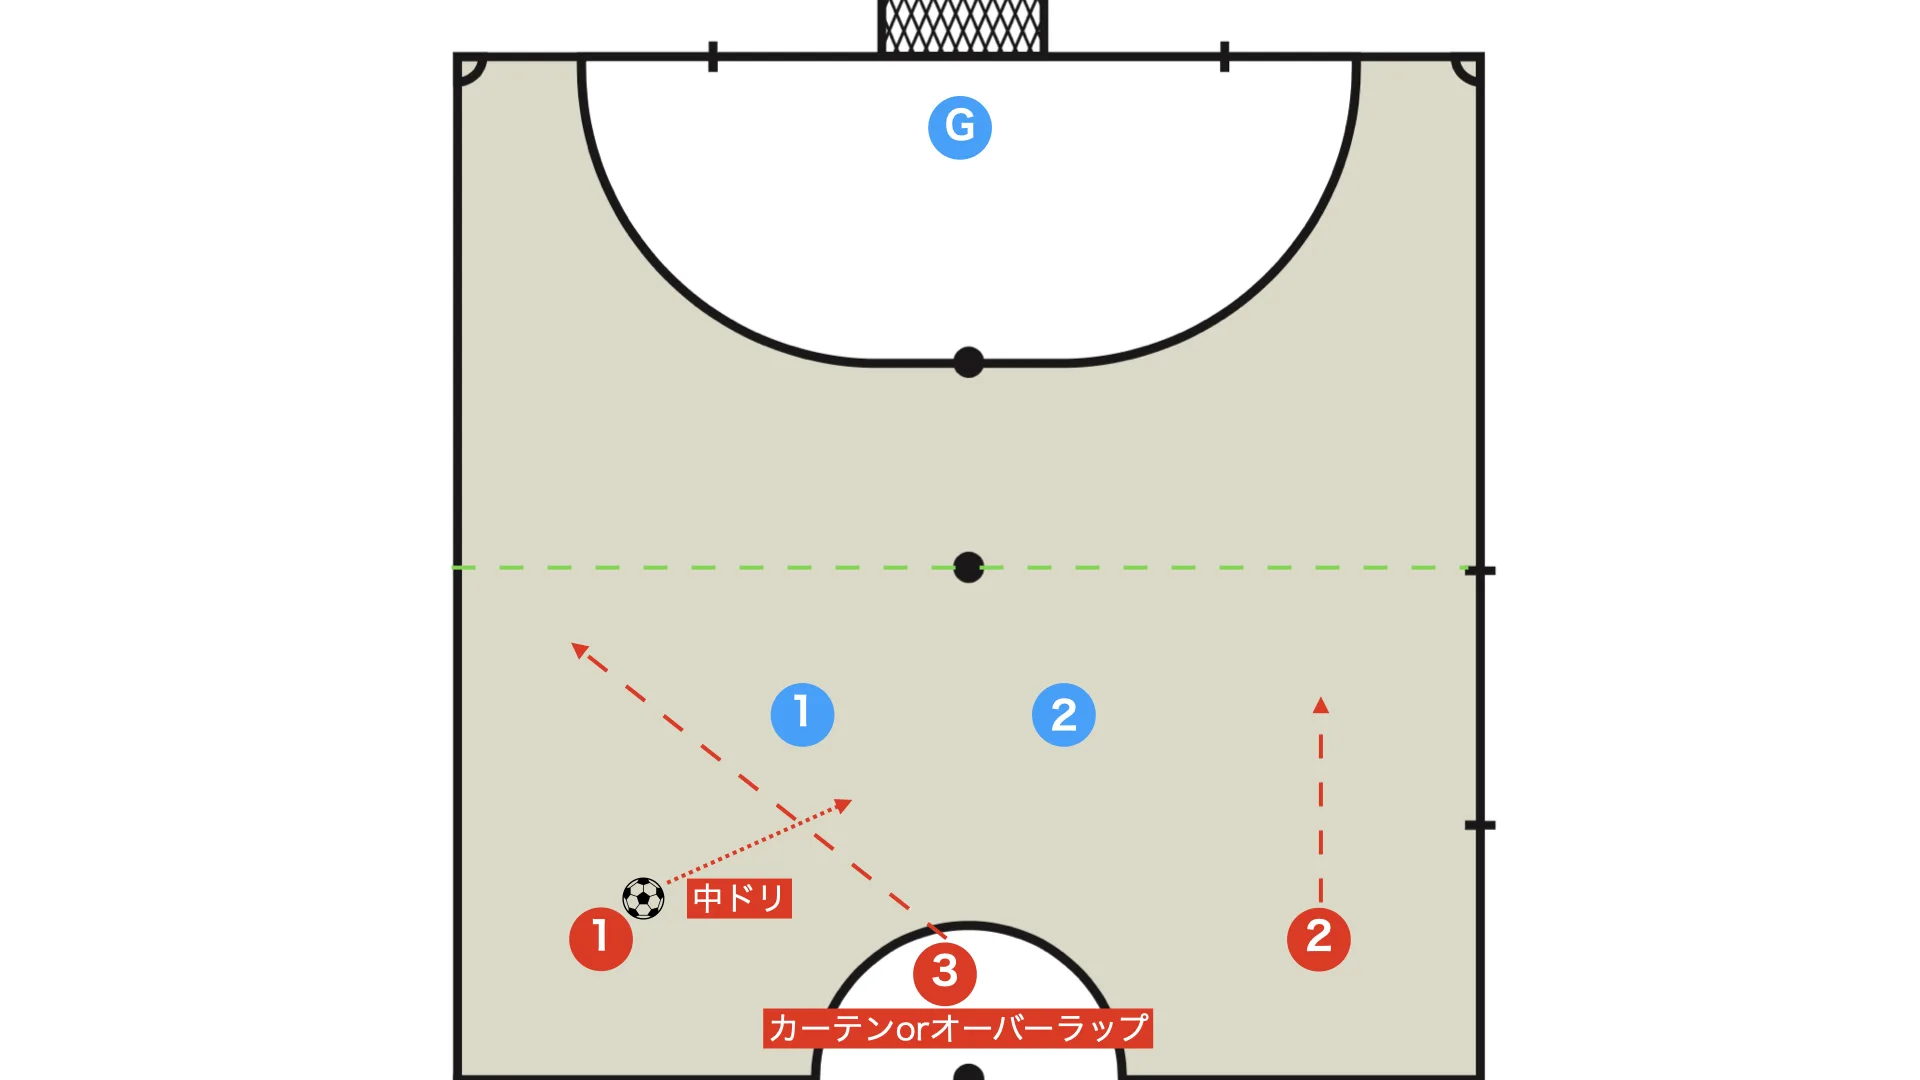
Because you want to keep both passing lanes available, the ball should always be carried into the middle.
Concrete ways to do that include the curtain, the block, and the overlap.
Among them, the curtain is especially effective because it not only moves the ball inside but also helps your teammate dribble inward in a better condition.
Once the ball has been brought into the middle, the wide players should overtake the ball carrier, who is now the central player.
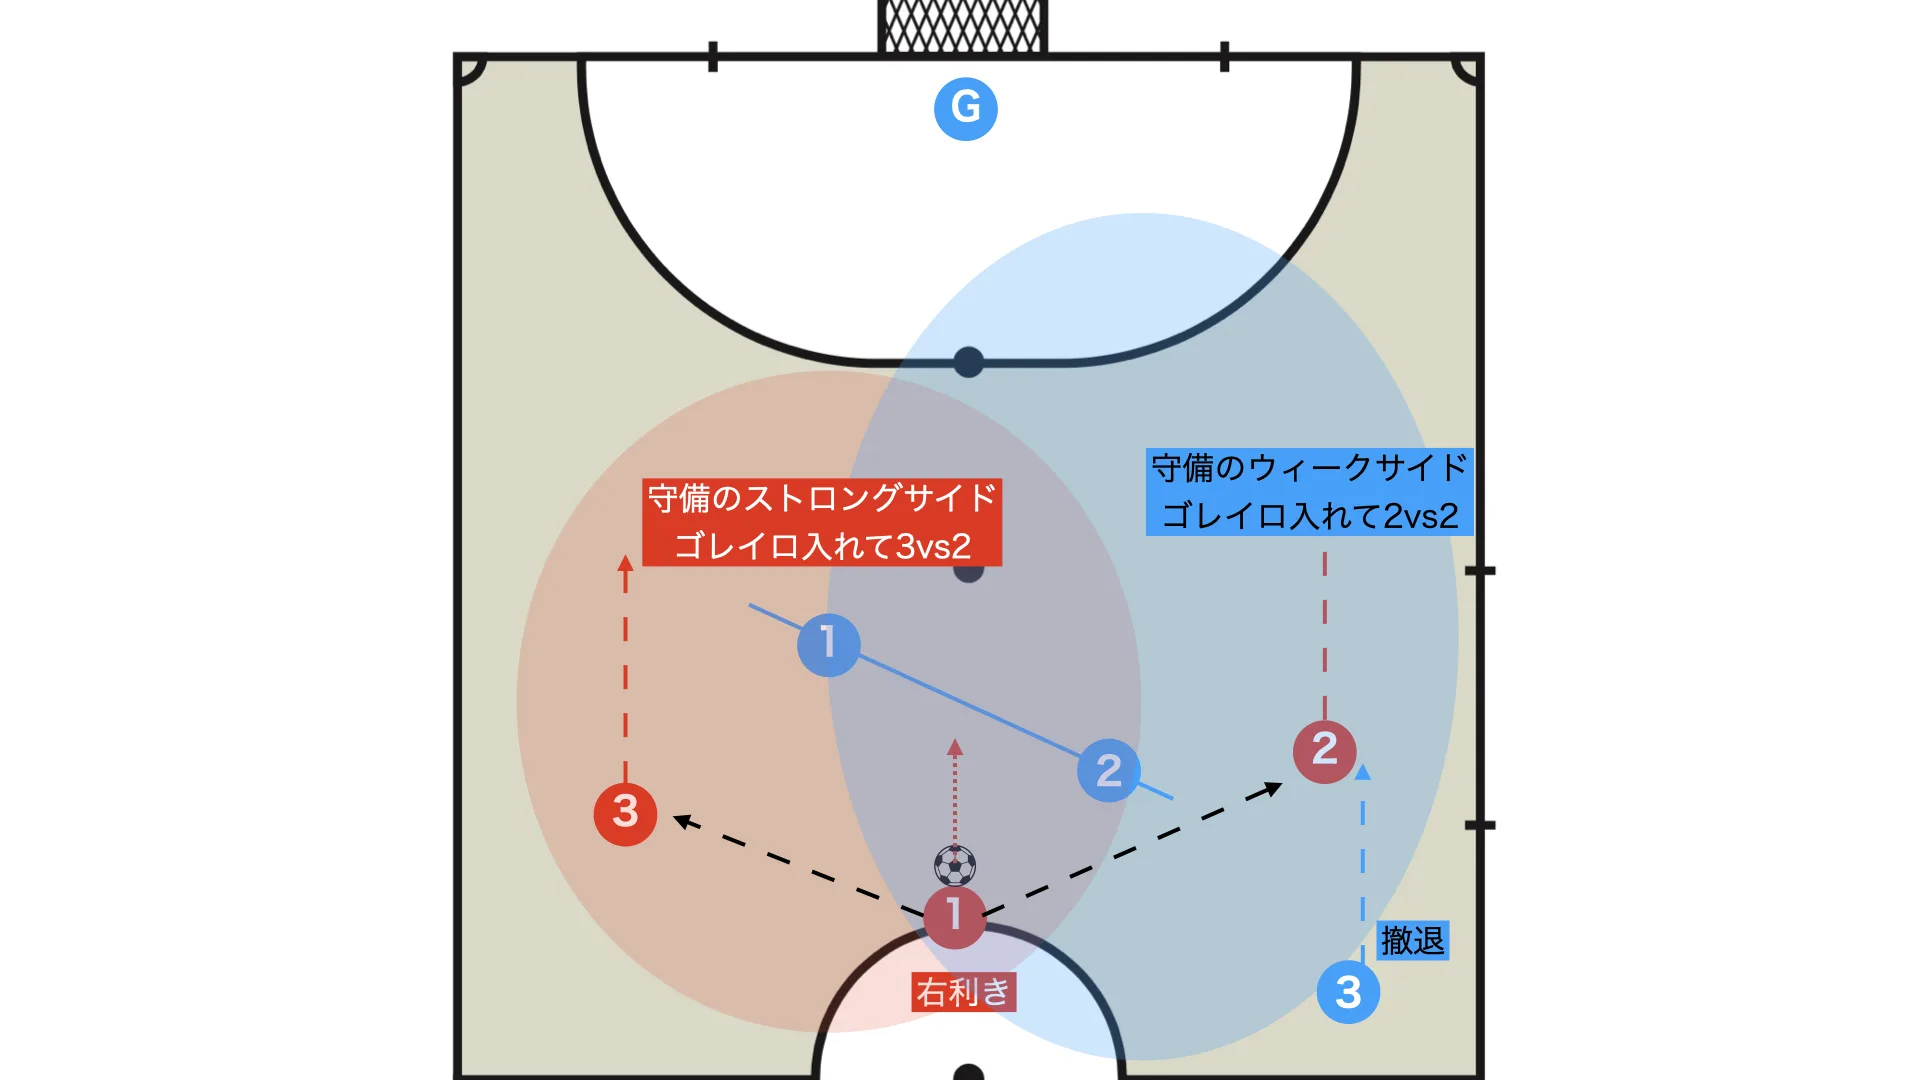
Defence
- Cut off the ball carrier's dominant-foot side and establish the defensive strong side
- Retreat while keeping an appropriate distance until the second penalty mark line
Attack
- Think about the attacking strong side in the same way as in 2v1 transitions
- Just as in 2v1, switch the ball to the defensive weak side early
- The ball carrier must always keep not only the pass but also the option of going alone (dribble or shot)
Why do defenders cut off the dominant-foot side?
The main idea is that they do not want to allow a shot on the dominant foot, and they also do not want to get beaten on the dribble on that side.
Since most players are right-footed, if you are facing an unfamiliar opponent, the default is usually to show them to their right side first.
The defender steps out at the second penalty mark line, and the attack should make its move just before that pressure arrives.
There are several techniques for switching play to the weak side, so I will introduce some of them here.
Because the defender is showing the ball carrier away from the dominant foot, it is effective to carry the ball slightly, shift the defender, and then pass to the defensive weak side with the other foot.
Another effective technique, often used by Kensuke Nakai, well known from F no Itadaki and formerly of Pescadola Machida, is to roll the ball with the sole of the dominant foot to draw the defender in and then switch to the weak side with the other foot.
Anything is fine, but it is a good idea to prepare at least one pattern you can rely on.
Because the defender has to protect the passing lane while still responding to the dribble, their legs are often open.
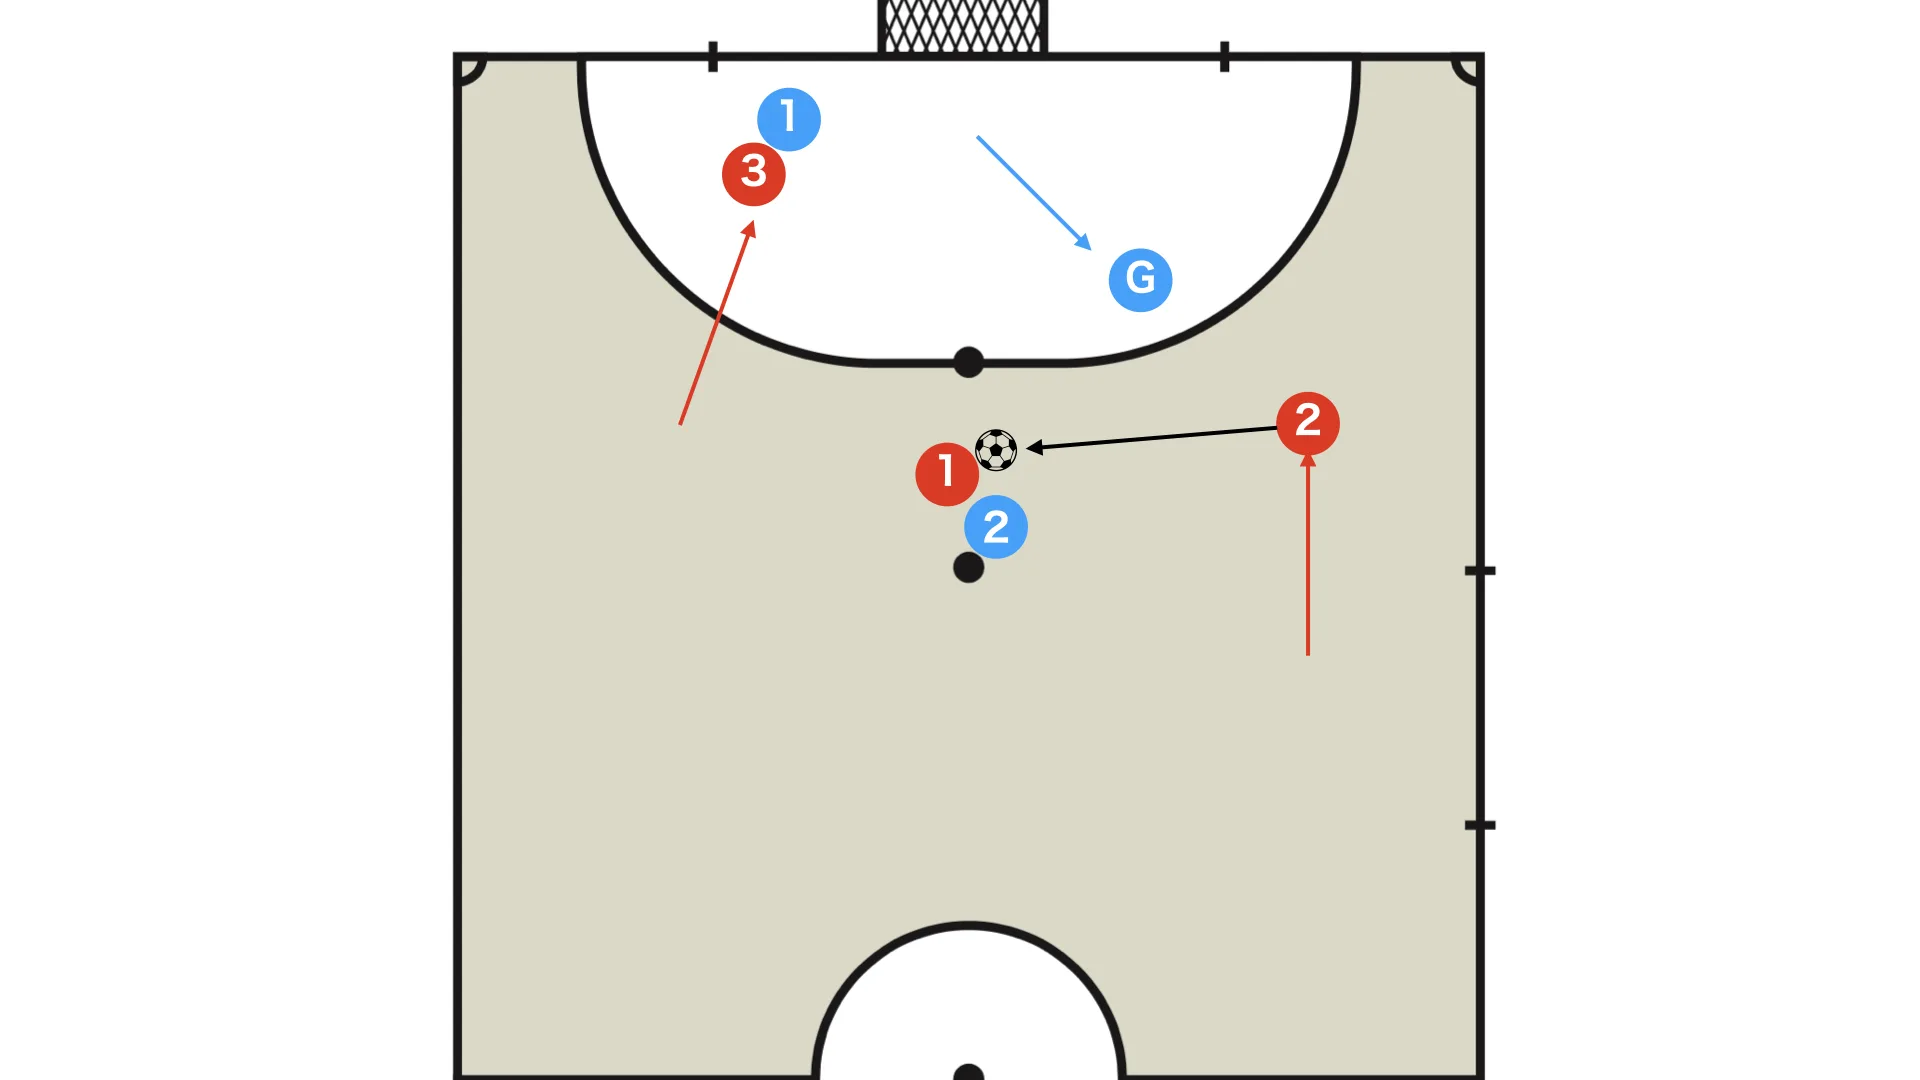
When the ball is switched to the weak side, the goalkeeper often comes out to block, and beating the goalkeeper 1v1 is not easy.
In that case, an effective option is to play a return pass and finish into the empty goal.
Supplement
Because the opposing defender will usually defend man to man, there is no guarantee that you will be able to receive the return pass freely even if you look open.
If you wait until the last possible moment to draw the defender in before passing, there is a good chance you can shake them off.
When attacking from the defensive strong side, the ideal is to picture the finish-triangle shape shown in the diagram and reach the finish simply with all actions played first time or within two touches.

When a player carries the ball through the center lane, it is easy for their mind to drift only toward passing options, but they should always keep the option of finishing the move themselves as well.
However, if their weaker-foot shooting technique is poor, there is a risk that the goalkeeper catches it cleanly and launches a counterattack, so that is something to be careful about.
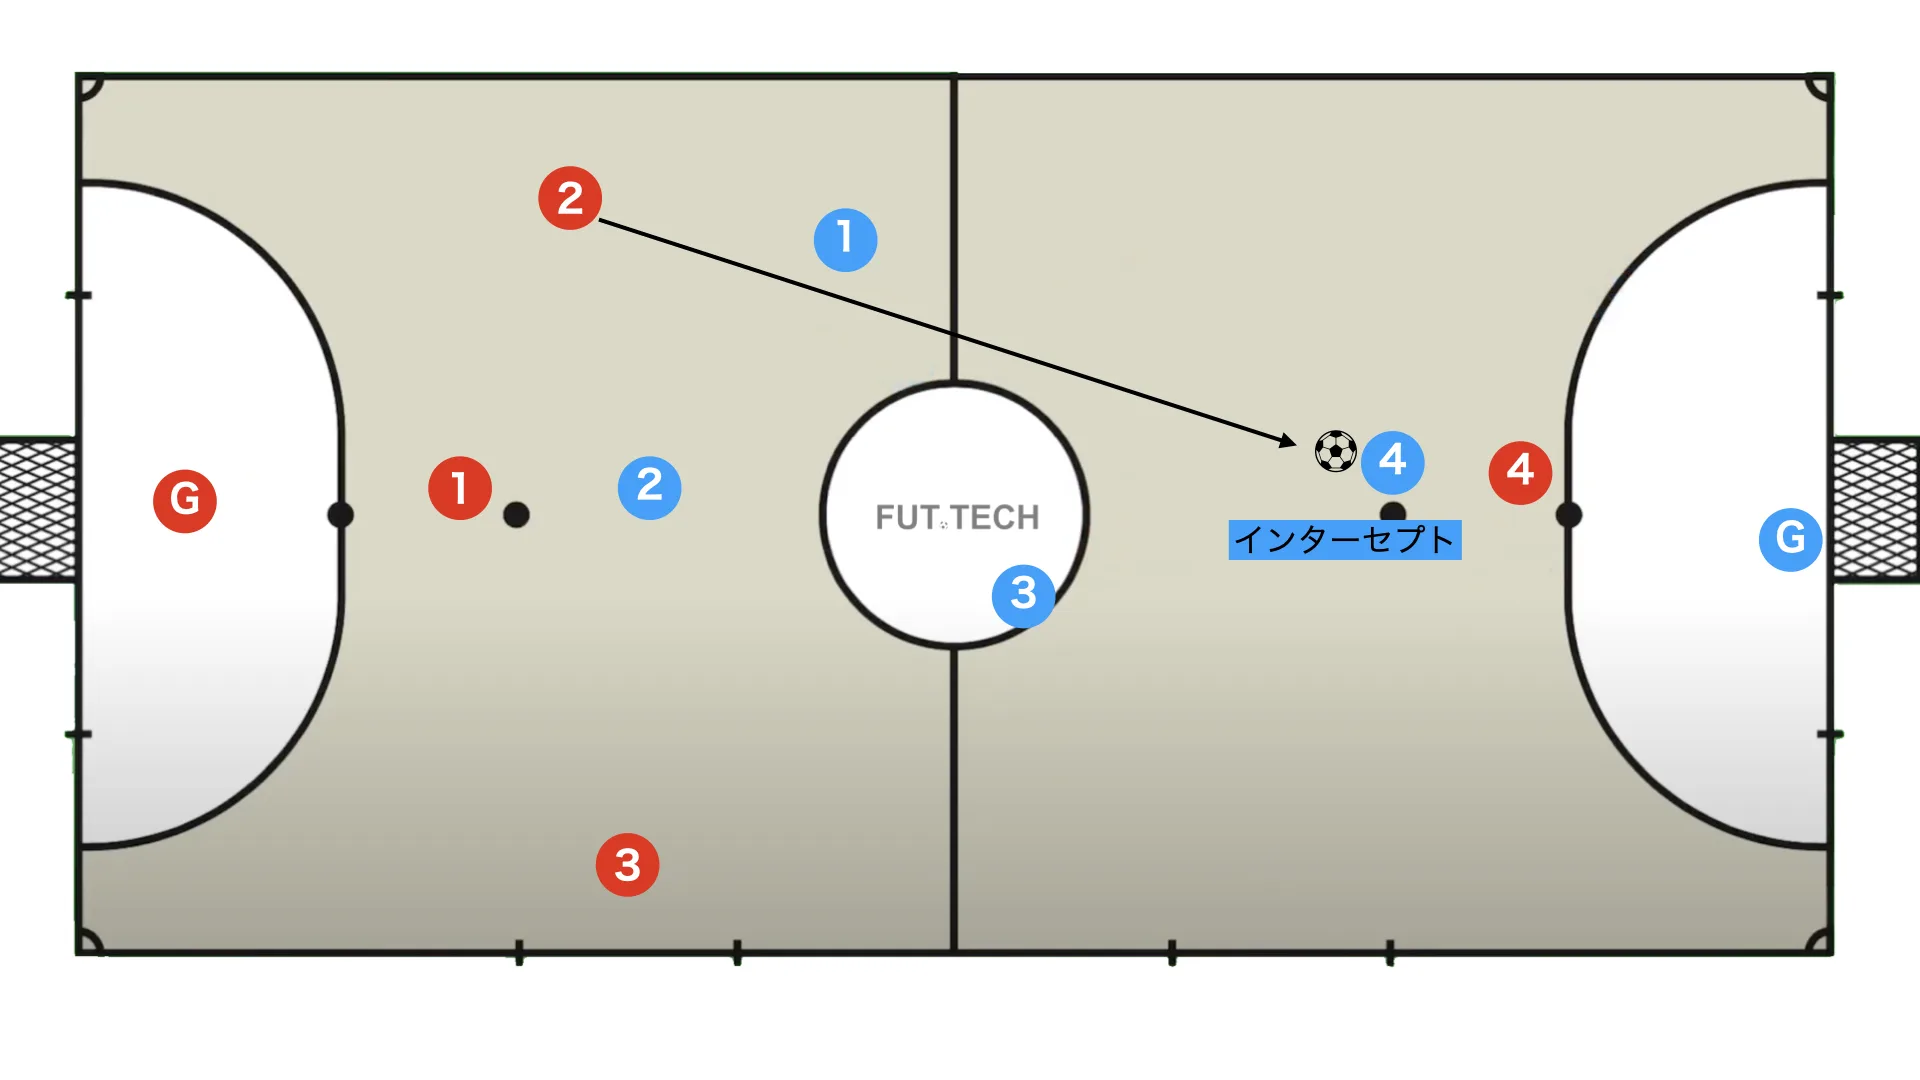
A 3v4 situation occurs when the fixo intercepts a pass aimed at the opponent's pivot.
As a rule, the attack should be completed by the front three players, using a finish triangle, while the deeper fixo stays behind to keep balance. If that fixo loses the ball here, the team can immediately be hit by a counter to the counter, which is extremely dangerous.
That is why it is important for the attack to manage risk properly while still reaching the finish efficiently.
Defensive principles in 3v4
Use man-to-man marking against the opponent in the defending third, and let the spare field player deal with the local numerical inferiority on the first line. (The pivot should recover quickly to the first line as the off-ball player.)